Banding Solutions for the OmniDTF

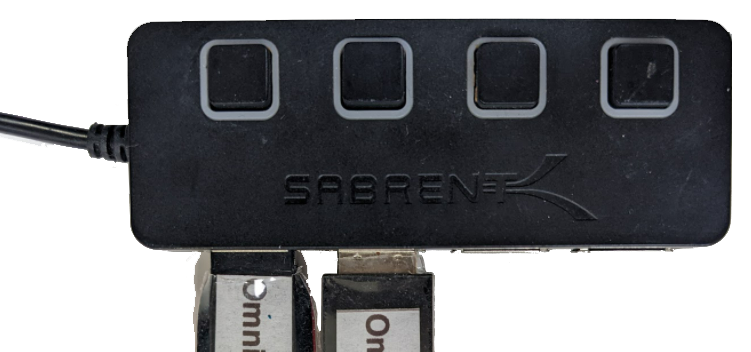
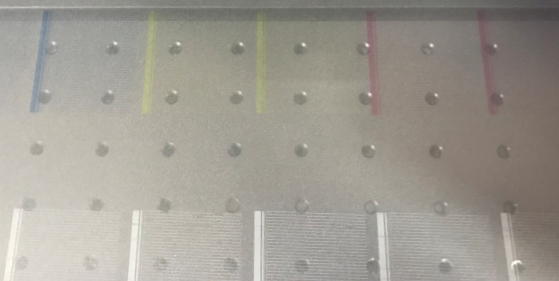
“Banding” refers to the appearance of visible horizontal lines or streaks on a printed image that appear in the left & right direction of printhead carriage movement. Rather than a streak of white or colored ink smearing across film that would indicate a head strike, banding appears as inconsistent ink coverage (see example photo below).

Banding example

Most Common Banding Solution

When troubleshooting a banding problem the first step is to print a nozzle check. This is done to distinguish between ink flow issues from mechanical or configuration issues.

If the nozzle check isn’t looking great when you experience banding there’s a good chance the issue can be resolved by simply running a printhead cleaning. This is because banding can occur during longer print jobs due to ink mist from the printing process building up and beginning to dry on a printhead’s nozzle plate. So if you’re currently experiencing a banding problem, run a nozzle check now and follow that with printhead cleanings, as needed, to resolve a poor nozzle check.

OmniDTF nozzle check example
Lower humidity environments will typically require more frequent head cleanings since the ink will be more prone to drying on the nozzle plates.

If head cleaning doesn’t result in getting a good nozzle check, something may be limiting the ink flow that will require more troubleshooting to resolve, which we’ll get into momentarily.

But first, if you are getting a good nozzle check but still have banding, there are a few software settings to check and confirm that it is optimized to provide great quality prints.

Let’s look at those software settings now.

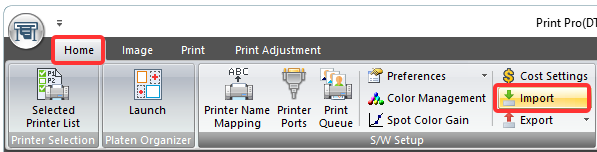
OmniDTF UI Software Settings

OmniDTF UI Settings screen, Feed Adjustment

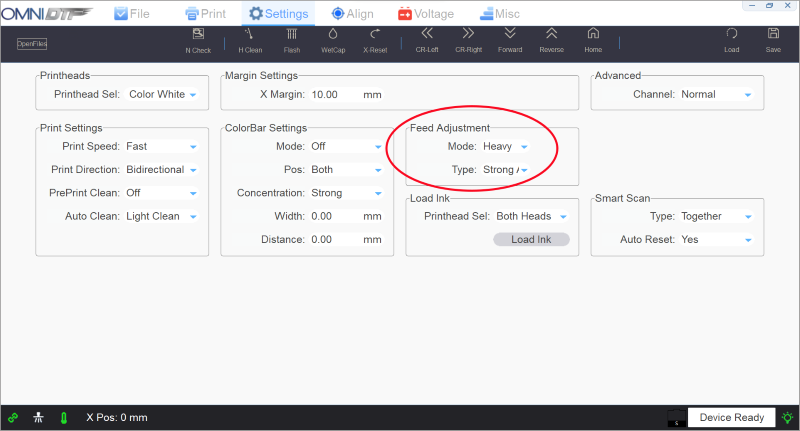
On the Settings tab of the OmniDTF UI software, check the Feed Adjustment section’s Mode and Type options. We want Mode set to “Heavy” and Type set to “Strong” for the best results.

Feed Adjustment recommended settings

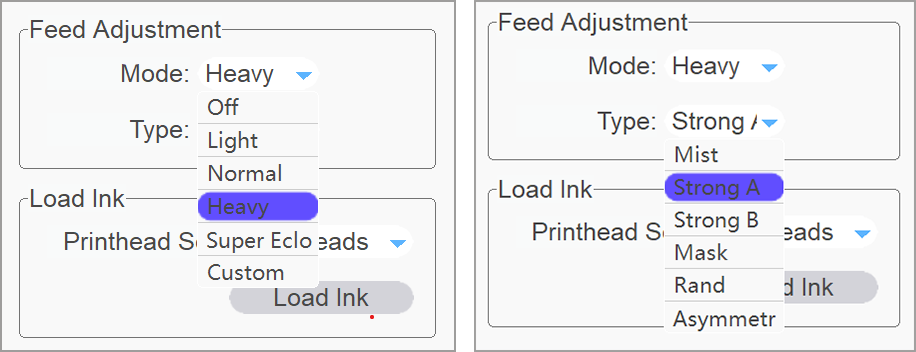
These are the normal, default settings of a new OmniDTF UI software installation, and it’s a super easy fix if your settings aren’t right.

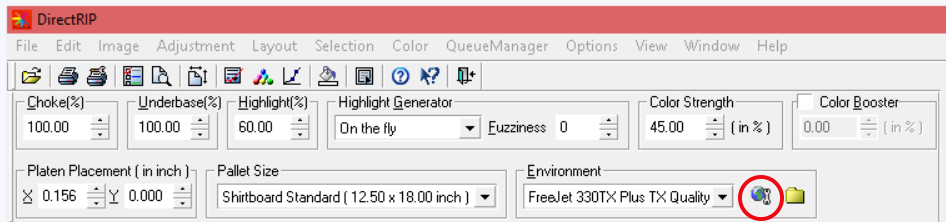
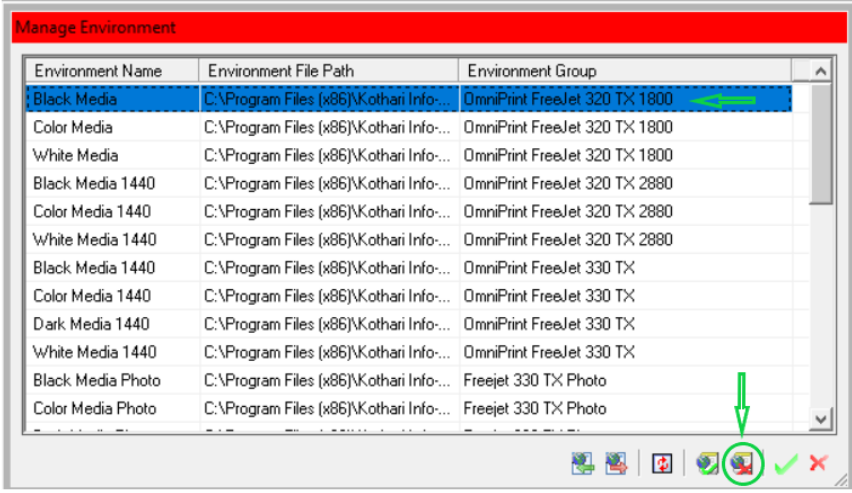
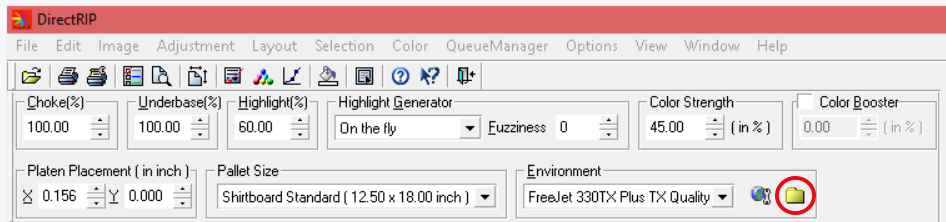
Print Pro Environments & Printing Resolution

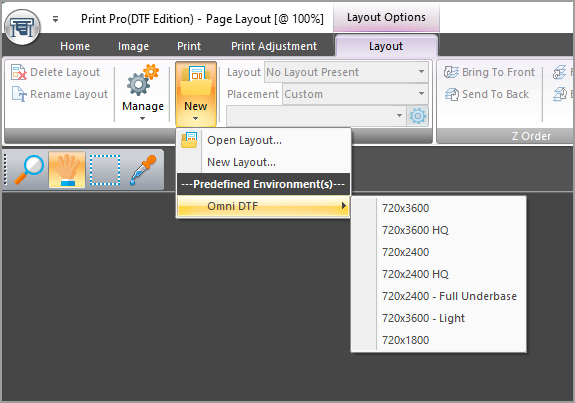
Another possible software solution for light banding is to increase the ink density that you’re printing by selecting a higher resolution Environment when setting up your Layouts in Print Pro DTF.

If currently using the 720×1800 Environment then try 720×2400, or if using 720×2400 then try 720×3600.

With those software settings out of the way, let’s dig into potential ink flow causes and solutions.

Ink Flow Limiting Causes & Solutions

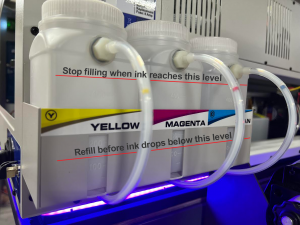
Low ink level in ink bottles
This is a simple but often overlooked fundamental cause of color dropouts and banding.

It’s important to keep an eye on ink levels and make sure they never drop below their defined minimum levels (see below image) before being refilled to ensure consistent ink flow.

OmniDTF ink bottle minimum and maximum levels

Air pockets or bubbles in ink lines
All of the components in the printer’s ink flow path are designed to maintain an air-tight system. In normal operation, with proper maintenance, there should be no air in the ink lines.

If you find air pockets or bubbles in one or more ink lines, use the Load ink feature for the white or color (or both) printheads to “prime” out the air pockets. As always, keep an eye on the waste ink bottle when using the Load ink and Printhead cleaning features and empty it as needed to ensure that it doesn’t overflow.

Clogged, damaged, or worn out damper
Dampers are consumable parts whose functions are critical to good ink flow. If a) you’re getting bad or inconsistent successive nozzle checks that aren’t resolved with head cleaning, b) your ink levels are good, and c) there’s no visible bubbles or air gaps in your ink lines (or air keeps returning to the lines after priming it out) then it’s recommended to contact OmniPrint technical support about replacing the damper for the problem channel(s).

There’s a link at the bottom of this page to another knowledge base article with details about dampers, in case you’re interested in more details about 4 things that dampers do to help maintain good ink flow.

Clogging in ink lines
Normal use and maintenance will prevent clogging of the ink lines, but excessive air in the ink lines or longer-term idle periods with no ink flow can result in dried or drying ink clogging the ink lines.

If your printer will be idle for more than 3 weeks (even if wet capped) we recommend contacting OmniPrint technical support to schedule an appointment and prepare the printer for extended downtime or storage.

Routine Preventative Maintenance
Finally, we recommend cleaning out your white ink bottles at least once per year to remove any sediment that may be collecting there due to the heavier pigment needed to product white ink.

Likewise, don’t forget to regularly agitate the white ink bottles to keep the white ink well-mixed and circulate the white ink during your routine startup process.

How to Manually Change DirectRIP’s Resolution Setting (video)

We normally print at the default resolution of the DirectRIP Environment selected for a given print job. For example, the FreeJet 330 TX and the FreeJet 330TX Plus TX Quality mode Environments both print at a high resolution of 1440 x 1440, while the Production modes for both printers use the 1440 x 720 resolution for higher speed printing.

The below video explains how to manually bump up the print resolution to 2880 x 1440, which can be helpful to lay down a higher density of ink when printing on thicker, more absorbent garments such as denim, canvas, and hoodies.

Print Pro Queue Manager Deep Dive (video)

In the below video and the following step-by-step instructions, we demonstrate how to rip an image or Layout to get the ink cost without printing. We’ll also show you how to save the ripped Layout to a file, including all sizing and configuration settings, and also how to load a previously saved rip for immediate printing.

Rip Without Printing

Once you have images and Layouts fully configured and ready to print, it’s simple to rip them without printing. Features of Print Pro’s Queue Manager can then be used to do things like determine the cost of ink needed to print the rip or to save the fully configured rip and quickly load and print it in the future.

For a refresher on how to set up images and Layouts see the Setting Up a Print knowledge base article.

Here’s how to rip an image or Layout in Print Pro.

  1. First complete your image(s) and Layout setup, including sizing and creating the white underbase choke for the images.
  2. Place the image(s) onto a Layout if you want to rip the full Layout.
  3. Select the image or Layout you want to rip by clicking on it.
  4. Click on the Add Job icon in the Queue Manager toolbar — the 2nd icon from the left.
    Add Job icon in Queue Manager
  5. Right-click on the new item added under the Queue Manager’s Job Info heading, then click on Rip. You may instead select the new line, then click the Rip Job icon on the Queue Manager toolbar — the 8th icon from the left.
    Rip icon in Queue Manager
  6. Queue Manager’s Status column will display “Ripping…” as it begins ripping the job. This message will change to “RipDone” when the rip is finished.

Viewing Ink Costs of a Ripped Job

  1. Click on the ‘+’ symbol to the left of the ripped job’s name in Queue Manager’s Job Info column.
    Ink costs in Queue Manager
  2. Scroll down the expanded view in the Job Info column to find the amount and cost of each ink color used in the design, as well as the total ink cost.

Saving a Ripped Job

Saving a ripped job is a two-step process. We first tell the software where we want the file to be saved, then we save it.

  1. Review the Save Location for the ripped file in the far right column of Queue Manager. If you want to save the rip to the currently designated location, skip to step 5.
  2. Under the Save Location heading, click on the line of the ripped job that you want to save.
    Save Location in Queue Manager
  3. Click on the ellipses (“…”) that appear at the right end of the line that you clicked on.
  4. In the “Save As” window that appears, navigate to the folder where you want the rip to be saved, and click on the Save button. This does not save the rip. It simply lets you edit the filename to be used and saves the location where the rip will be saved when you do save the rip in the next step.
    Save As... Rip location
  5. Click on the Queue Manager’s Save Job button (a disc icon) to save the rip to your designated location.
    Save Job icon in Queue Manager

Loading a Saved Rip

Loading a saved rip is quick and easy. Since all image and Layout parameters were included when the ripped file was saved, once the rip is loaded it can be immediately printed.

  1. Click on Queue Manager’s Load Job icon. The first icon from the left, with the appearance of an open folder.
    Load Job icon in Queue Manager
  2. In the File Open window that appears, navigate to the folder where the rip file you want to print was stored, then select the rip file and click Open.
    Open a saved rip file in Queue Manager
  3. When the saved rip appears in Queue Manager’s Job Info column, right-click on it and select Print or click on the Print Job icon in Queue Manager’s toolbar.
    Print saved rip in Queue Manager
    • If the print options are grayed out, ensure your printer is selected in Queue Manager’s Printer Name column.
      Printer Name in Queue Manager

Printer Missing in DirectRip after Windows 11 Update

Problem: An update for Windows 11 has been found to block DirectRip from loading the list of available printers in the Print Setup window, so the R2400 device name is no longer available for selection.

Preliminary checks: There are a few things other than a Windows 11 update that may result in the printer being missing from the available Port options in the Print Setup window. Check these fundamental items before proceeding with the fix for Windows 11.

  • Confirm that the Freejet printer is completely turned on with the Power light on the control pad lit.
  • Confirm that the Maintenance tab of the R2400 driver’s Printing Preferences window can send a head clean or nozzle check to the printer.
  • Confirm that DirectRIP is running as Administrator. If you’re not sure, right-click on the icon for a Run as administrator option.

If the above three points check out, proceed with the fix for the Windows 11 issue.

Solution: Close DirectRIP (if it is running) and then run the “Updater” patch tool linked at the bottom of this article using the following steps:

  1. Download ‘221015_OMNI_DirectRIPForWindows11_USBPortPatch.zip‘ from the below link to the PC with DirectRIP on it.
  2. Double-click on the downloaded .zip file to view its contents in Windows File Explorer.
    Contents of Windows 11 patch zip file.
  3. Click & drag the ‘10_15_2022_OMNI_DirectRIPForWindows11_USBPortPatch‘ folder from File Explorer to the Windows Desktop.
  4. Double-click on the new folder that was copied to your Windows Desktop (‘10_15_2022_OMNI_DirectRIPForWindows11_USBPortPatch‘) to open that folder and display its contents.
    File Explorer with Updater.exe and Run as admin option.
  5. Right-click on Updater.exe, then click on ‘Run as administrator‘. If Windows prompts you with the message, “Do you want to allow this app to make changes to your device?“, click the ‘Yes‘ button.
  6. When prompted with the following message, make sure that DirectRIP is not running and then click the ‘Yes’ button.
    Prompt to shut down Print Pro (DirectRIP).
  7. The DirectRIP folder will be displayed in a new window. Just click the ‘OK‘ button to continue.

That’s it! You can now load DirectRIP and the printer will now be listed in the Print Setup as an available Port to select.

Ethernet Configuration for OmniDTF (video)

The OmniDTF printer uses the TCP/IP (Transmission Control Protocol/Internet Protocol) over an Ethernet connection to communicate with your PC. This requires a one-time configuration in Windows, which OmniPrint Training sets up for you during your initial training session.

The following information will help you to perform that same configuration if you should ever need to update your PC’s Ethernet adapter or if you’ve installed the OmniDTF UI and Print Pro software onto a new PC.

Your OmniDTF printer and its software implementation are not designed to communicate over the Internet or any other network. We use a simple point-to-point connection between one PC and the printer, directly connected with a single Ethernet (“RJ45”) cable.

There are two pieces of software where we configure TCP/IP parameters: Microsoft Windows (Control Panel) and Print Pro. We’ll cover both in that order.

Microsoft Windows

Windows Control Panel’s Network and Sharing Center is where any Ethernet adapters to be used in a Windows PC are configured. Use the steps in the below video or the following written instructions to configure an Ethernet adapter for use with the OmniDTF.

  1. Run Windows Control Panel.
  2. Click on Network and Sharing Center.
    Windows Control Panel - Network and Sharing Center
If you don’t see Network and Sharing Center in Windows Control Panel, it is because Control Panel is in the Category View mode. In that case, first click on Network and Internet, then click on Network and Sharing Center.
  1. Select Change adapter settings
    Change adapter settings
  2. Double-click on the Ethernet adapter to be used (or right-click on the adapter and select Properties).
    Control Panel - Network Adapters
Your Ethernet adapter may have a different description than the Ethernet 4 pictured above. Don’t be concerned if there is a red ‘x’ on the adapter, which simply means that it isn’t currently connected to anything.
The ExpressVPN TAP Adapter does not represent a physical (actual) Ethernet hardware port and is not usable. This is strictly a “virtual” adapter built into Windows for creating VPN connections and has no purpose for the OmniDTF.
  1. Double-click on Internet Protocol Version 4 (TCP/IPv4) (or single-click on it and then click the Properties button).
    Ethernet Properties
  2. Click the Use the following IP address radio-button (if it isn’t already selected) and enter the following, then click ‘OK‘.
    IP address: 192.168.127.12
    Subnet mask: 255.255.255.0
    IPv4 Properties (IP address)

The Windows Control Panel Ethernet configuration is now complete!

Print Pro

Also, Print Pro needs to know the IP address to use for its communication with the OmniDTF printer. Follow the steps in the below video or the following written instructions to set that up.

  1. Run the Print Pro program.
  2. From the Home tab, click on Printer Name Mapping.
    Printer Name Mapping button on Home menu toolbar.
  3. Double-click on the first cell space under the Physical Printer Port heading.
  4. Click on the drop-down lists’s down-carat symbol (downward pointing triangle) at the right end of the cell/box.
  5. Select “127.0.0.1,9100 (TCP/IP ,RAW)”.
  6. Double-click on the first cell space under the Printer Model heading.
  7. Click on the drop-down list’s down-carat symbol.
  8. Select “Omni DTF”
  9. Double-click on the first cell space under the Printer Name heading.
  10. Type “OmniDTF” into the cell (or your preferred name for the printer).
  11. Confirm that your settings look like the image below, then click on the green checkmark icon to save the settings.
    Map Printer Name dialog

The Print Pro Ethernet configuration is now complete!

How to Update OmniDTF Print Pro DTF Environments

About Environments

Print Pro DTF Environments are collections of preset options used to select the printing resolution and other parameters when setting up a print job for the OmniDTF.

Here is the current set of Environments, as shown in Print Pro DTF by selecting the Layout tab, then clicking on New and hovering over Omni DTF.

To update the Environments in Print Pro for your OmniDTF printer, download the file at the bottom of this article and follow the instructions in the below video or the following written steps.

Video Demonstration

Installing the Environments

The installation process of the Environments is quick and easy.

  1. Download the Environments file to the PC on which you’ve installed Print Pro.
    • See the download link at the bottom of this article.
  2. Extract the .kiee file from the downloaded zip file.
    • Placing the file on the Windows Desktop is recommended to easily find the file. It can be deleted after this installation process.
  3. Run Print Pro.
  4. Select the Home tab, then click the Import button.
    Print Pro Home tab and Import button

  5. Select the .kiee file that was unzipped from the download, then click the Open button.
  6. If prompted with a message of “Already ‘Omni DTF-720×3600’ environment exist.” (The actual environment name will vary), click the Yes button.
    • If prompted to Select environment settings to use, select ‘Use new environment settings only’ and click OK.
  7. Click OK on the “Media packages imported successfully” window.
    Import successful message

  8. Exit out of the Print Pro program, then restart it.

The OmniDTF Environments have now been updated and are ready for use.

Print Pro Environments download link

DirectRIP “Can not open file” Error

While the below-pictured DirectRIP error message may seem alarming, it is easy to resolve using the steps detailed below.

Your exact file path and filename in the message may differ, but the same solution applies.

Why is this happening?

This error will occur if a DirectRIP installation has missing or corrupt files that are needed when an Environment is selected.

How to resolve the issue

There is a video following these instructions which demonstrates steps 3-6.
  1. Close the DirectRIP program if it is running
  2. Download the ‘RIP Files.zip’ archive file from the link at the bottom of this article to your Windows Desktop
  3. Right-click on the downloaded ‘RIP Files.zip’ and select ‘Extract All…’

  4. Click the ‘Show extracted files when complete’ checkbox, then click the ‘Extract’ button

  5. Right-click on the DirectRIP shortcut, select ‘Properties’, then click on ‘Open File Location’ from the ‘Shortcut’ tab in the ‘DirectRIP Properties’ window
    1. This will open the DirectRIP application folder in another File Explorer window
  6. Copy the three folders from the newly created ‘RIP Files’ folder to the DirectRIP application folder
    1. Allow Windows to replace any & all existing folders and files when prompted

Solution video clip

Expand the below video to full screen for the best viewing experience.

Next time you start DirectRIP, the Environments will work as expected without the error message.