- 1. Printer Controls
- 2. Control Pad
- 3. Front Panel Switches
- 4. Heater Controller
- 5. Dust-Curing Machine Controls
- 6. Control Panel
- 7. Power Switch
- 8. Emergency Switch
- 9. Dusting Switch & Speed control
- 10. Shaking Switch & Speed control
- 11. Curing Oven Temperature
- 12. Changing the temp setting
- 13. Take-up Roll Motor Switch
The OmniDTF has a robust set of hardware controls, making it simple and convenient to operate most routine functions directly from the printer itself. Here’s a brief rundown on the position and function of each of these controls.
Printer Controls
Control Pad
This is the set of pressure-sensitive buttons on the front of the printer, to the right of the platen.
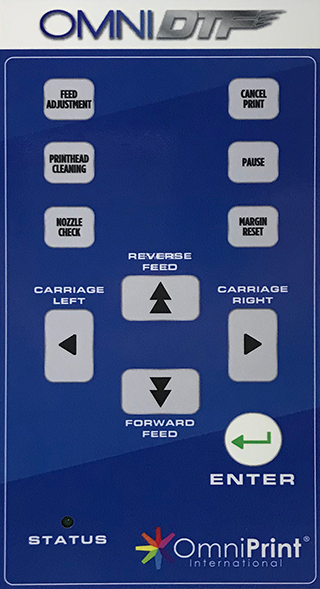
Feed Adjustment: Adjust vertical feed between print passes (use only as directed by Omniprint staff.)
Printhead Cleaning: Run a Light printhead cleaning on both printheads.
Nozzle Check: Print a test pattern to confirm that ink flow is optimal and ready to deliver quality prints.
Cancel Print: Stop printing and remove the remaining print job from the printer’s memory.
Pause: Temporarily stop printing. Pushing Pause a second time will prompt you to continue printing.
Margin Reset: Change the right margin from the default of 10mm (use only as directed by Omniprint staff.)
Carriage Left / Carriage Right: Move the printhead carriage to the left or to the right of its current position. Hold the button for continual movement.
Reverse Feed / Forward Feed: Feed film forward (toward the front of the printer) or backward.
Enter: Submit responses to prompts on the display panel or move the printhead carriage to the Home position (above the capping stations) if there is no prompt
Front Panel Switches
There are three switches positioned directly below the Control Pad. Two of these can generally be thought of as set it and forget it, and the third is essentially an emergency kill-switch. Here are the details.
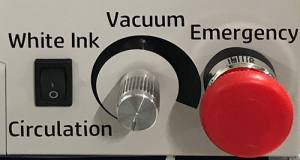
White Ink Circulation: When toggled to the ON (1) position, white ink is circulated for 1-3 minutes.
Vacuum: This rotary switch turns on and adjusts the suction of the platen’s vacuum. We recommend turning it on and adjusting it to its lowest level for optimal film feeding and platen temperature stability.
Emergency: This red “kill” switch immediately shuts off power to the printer’s electronics when depressed. Once depressed this latching switch will remain engaged and prevent the printer from operating until it is rotated clockwise about ¼ of a turn. It will then pop out and normal operation will be restored.
Heater Controller
The Heater Controller is used to adjust and provide status of the OmniDTF printer’s two film heaters. One heater sits behind the platen, to preheat the film as it enters the printer chassis. The second one is under the platen, to keep the film warm as it is being printed on. Heating the film helps the ink set quickly, so the white layer can be applied just seconds after the color layer.
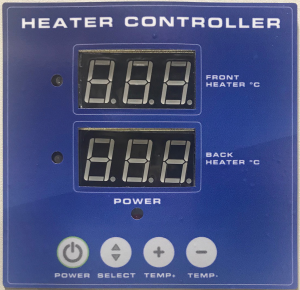
Front Heater & Back Heater: The Front Heater and Back Heater numeric displays report each heater’s current temperature in Celsius. When changing the temperature setting, the displays show the changes being selected.
Power: The Power button turns both heaters ON or OFF, toggling their current status. The heaters automatically turn off when the printer is switched off. If the heaters were on when the printer was switched off then they will automatically turn back on when the printer’s power is turned on.
Select: To change a temperature setting for a heater, that heater must first be selected by pushing the Select button, after which the numeric display of the currently selected heater will flash. The first press of the Select button selects the Front Heater. A second press selects the Back Heater. A third press of the Select button exits the temperature adjustment mode.
Temp: The Temp (+) and Temp (-) buttons are used to raise or lower the temperature setting of the currently selected heater.
Dust-Curing Machine Controls
The Dust-Curing Machine has its own power cord and switch, so is plugged into a separate outlet from the printer. While the two pieces of equipment are powered and controlled independently, they form a single, complementary system.
Most of the controls on the Dust-Curing Machine are found on a single control panel on the right side of the equipment. We’ll detail each of those first and then move on to the exceptions.
Control Panel
Here you’ll find switches for Power, Dusting, Shaking, Curing, and an Emergency off switch. In addition to these switches, there are also granular controls for setting the dusting speed, shaking speed, and curing oven temperature.
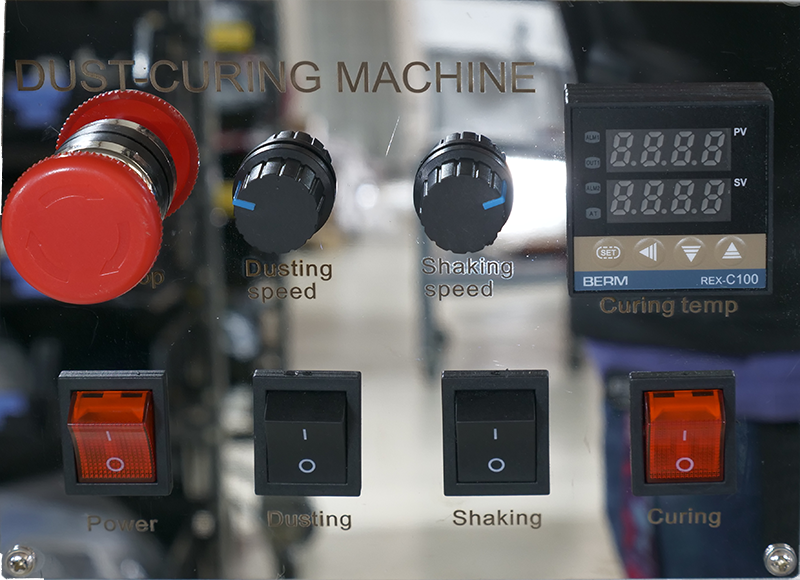
Power Switch
The Power switch in the lower-left corner of the Control Panel is the master power for all other switches and functions of the Dust-Curing Machine. When this switch is OFF, all other switches and controls of the Dust-Curing Machine are inoperable because there is no power being supplied to any part of the unit.
Emergency Switch
The round, red Emergency button above the Power switch will immediately shut off power to the Dust-Curing Machine when depressed.
This is a “latching” switch which, once depressed, will prevent the Dust-Curing Machine from operating until the switch is released. If you ever find that the Dust-Curing Machine won’t turn on from it’s power switch, make sure this switch is not depressed.
To release the switch, rotate the handle clockwise for approximately ¼ turn. Once the switch is rotated clockwise, a spring will push it back out and power will then be restored to the Dust-Curing Machine if, or as soon as the Power switch is in the ON position.
Dusting Switch & Speed control
There are two Dusting controls used to add DTF Powder onto the film as it passes through the powder application chamber.
Dusting switch: This switch toggles the power to the rotating Dusting blades in the DTF Powder Feeder to sweep powder into position to cascade onto the film through narrow slits in the bottom of the powder feeder.
Dusting Speed dial: This dial is used to adjust the rotational speed of the DTF Powder Feeder. The further it is turned clockwise the faster the feeder will rotate and sweep DTF Powder into position to be dusted onto the film.
Shaking Switch & Speed control
There are two Shaking controls used to remove excess DTF Powder from the film after it has been applied by the Dusting feature.
Shaking switch: This switch toggles power to the rotating Shaking spindle with short plastic straps that shake the film as they rotate, shaking any excess DTF Powder back onto wet ink or into the Powder Recycle Bin.
Shaking Speed dial: This dial is used to adjust the rotational speed of the Shaking spindle. The further it is turned clockwise the faster the straps will shake the firm to knock excess DTF Powder loose.
Curing Oven Temperature
There are two controls for the Curing Oven. Remember that using a temperature that will effectively cure the ink and melt the DTF Powder is an important part of the DTF production process. We recommend starting with a setting of 120 Celsius and adjusting from there as needed.
Curing switch: The curing switch turns power for the Curing Oven and the Curing Temp Controller ON and OFF.
Curing Temp Controller: The Curing Temp Controller is used to set and monitor the oven temperature, using four buttons and two numeric displays.
When the Curing power is switched on, the upper display shows the current oven temperature, and the lower display shows the temperature setting.
Changing the temp setting
Set button: Push and hold the Set button until the lower numeric display begins to flash.
◄ button: When in the temperature setting mode (having been activated by the Set button), the temperature setting display shows a cursor in the rightmost column of the setting number.
We recommend making temperature adjustment in 5-degree increments, so for most temperature changes you’ll want to adjust from this rightmost position. To change the setting in increments of 10’s, use this button to move the cursor one digit to the left – to the 10’s position.
▼ button: Use this button to reduce the temperature setting at the cursor position.
▲ button: Use this button to increase the temperature setting at the cursor position.
Take-up Roll Motor Switch
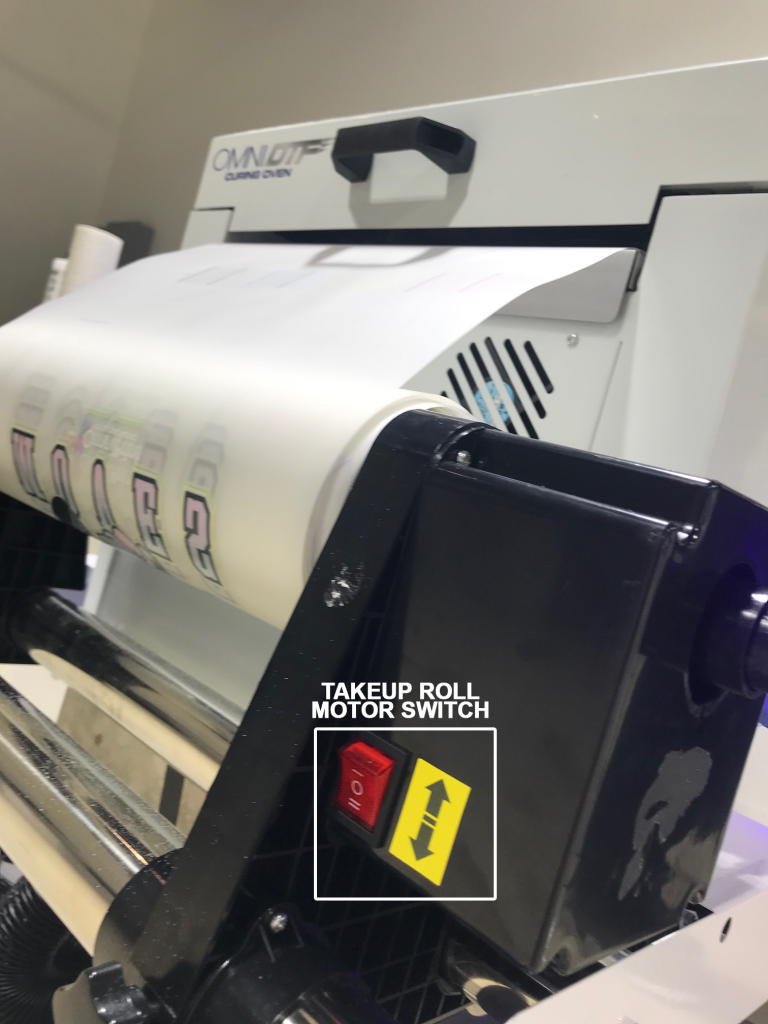
This 3-position switch is set to the down position to enable the motor to rotate the take-up roll counter-clockwise (from the perspective of the side of the Dust-Curing Machine controls.) The center position turns the motor off, and the top position is for reverse feeding film backwards, toward the oven and printer.
Not finding what you need?
You can contact our technical support team by sending an email to support@omniprintonline.com with your company name, contact name, phone number, printer serial number, and a quick description of how we can help you.
This will automatically open a support case for you in our ticketing system and a technical support rep will follow up with you shortly.