You will occasionally want to adjust the printhead alignment of your OmniDTF or Omni DTF Mini printer, to maintain ideal horizontal & vertical registration between the color and white layers of your prints. This adjustment does not involve manually repositioning the printheads. Instead, it is done using the provided UI software.
The process is identical for the OmniDTF and the Omni DTF Mini printers. View the below video or read the following instructions for each step of the printhead alignment process.
Print Speeds
There are three Print Speed settings for the OmniDTF & DTF Mini printers. In both cases, we recommend using the default setting, which is the fastest speed.
All printhead alignment adjustments are made for a given Print Speed, so the print speed selected for alignments should be the same as the print speed selected for printing on the Settings tab.

Alignment Types
There are four types of alignments that can be done. We’ll explain and detail the process for each following the list of types below:
- Head Vertical Distance Adjustment
- Head Horizontal Distance – Left Adjustment
- Head Horizontal Distance – Right Adjustment
- Bidirectional Adjustment
To get started, all printhead alignment adjustment types are found under the Align tab of OmniDTF UI program.
Head Vertical Distance
This adjustment, labeled Head Vert Distance Adjust in the software, aligns the white printhead with the CMYK printhead as the film moves forward while printing. (This “vertical” movement of the film is considered the Y axis, while the carriage’s left & right motion is considered the X axis.)
- Select your Print Speed to match that on your Settings tab (or the speed you want to now align for if you’re running alignments for multiple speeds.)
- Select the Head Distance option on the left side of the Align screen.
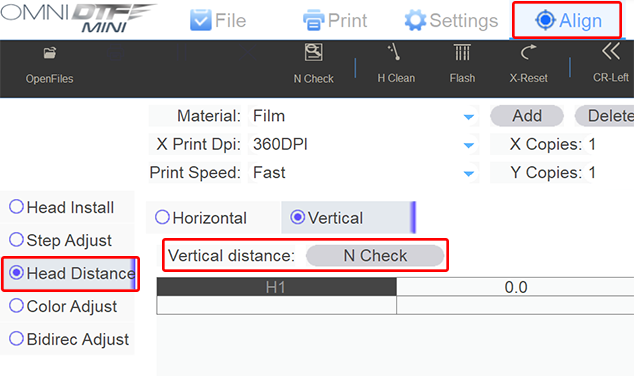
- Click the N Check button under the Head Vert Distance Adjust heading when you’re ready to print the test pattern.
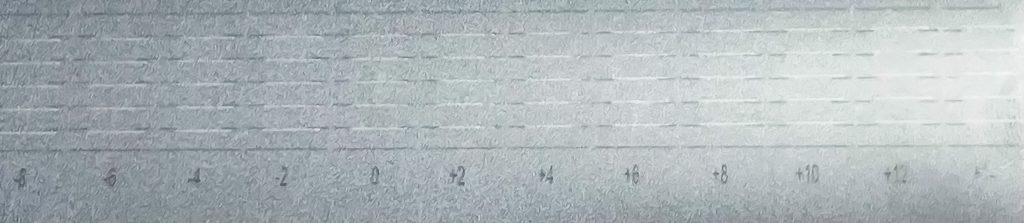
The test pattern prints a series of black & white horizontal line segments above numbered labels. The numbers range from -14 to +14, in increments of 2 and with zero in the center position.
While the alignment process on the OmniDTF and the Omni DTF Mini printers is identical, the test pattern for the vertical alignment is slightly different. So we’ll also show the pattern printed on the Omni DTF Mini, as well.

Yes, it’s a bit of an eye test, but our task is to identify the column number whose line segments show the black & white portions in best alignment with each other, resulting in a single straight horizontal line. In the first of the two above examples (printed on the Omni DTF), the best column is ‘+4’.
In the ‘+2’ column the white segments are slightly below the black segments, and in the ‘+6’ column the white segments are slightly above the black segments. As you look to the left of the ‘+2’ column you can see that the white segments keep getting further below the black segments and to the right of the ‘+6’ column the white segments keep getting further above the black segments.
So, our takeaway from the evaluation of the test print is that the column with the best alignment is ‘+4’.
- Now let’s return to the OmniDTF UI software’s Head Vert Distance Adjust section and note the current value of H2. In our screenshot from step #2 above, the value of H2 is “1453” and the number we got from evaluating the test print in step #3 was ‘+4’, so we add ‘4’ to ‘1453’ and enter the result of 1457 into the H2 field.
If the column number from step #3 had been a negative number (‘-4’, for example), we would have subtracted ‘4’ from ‘1453’ and entered ‘1449’ into H2. - Click the Save button in the top right corner of the OmniDTF UI window to make the alignment adjustment.

- Repeat step #3 above to print another test pattern. This should result in the best-aligned column sitting in the ‘0’ position. If this is the case, the vertical distance adjustment is now completed. If not, repeat steps 3 – 5 to ensure that the best alignment is in the ‘0’ position
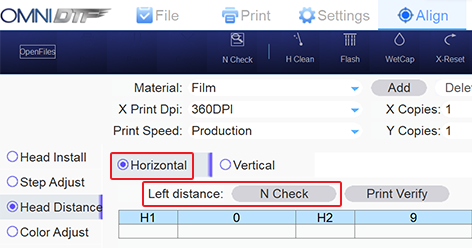
Left Horizontal Distance
There are two horizontal distance adjustments under the Head Horz Distance Adjust heading. This is because your OmniDTF prints bidirectionally, so the white and CMYK printheads need to be aligned in both printing directions. The Left Adjust is used for the horizontal alignment when the carriage is moving from right to left, and the Right Adjust for when the carriage moves from left to right.
- Click the Left distance N Check button to run a test print.
The test pattern prints a series of black & white vertical bars above numbered labels. The numbers range from -12 to +12 with zero in the center position.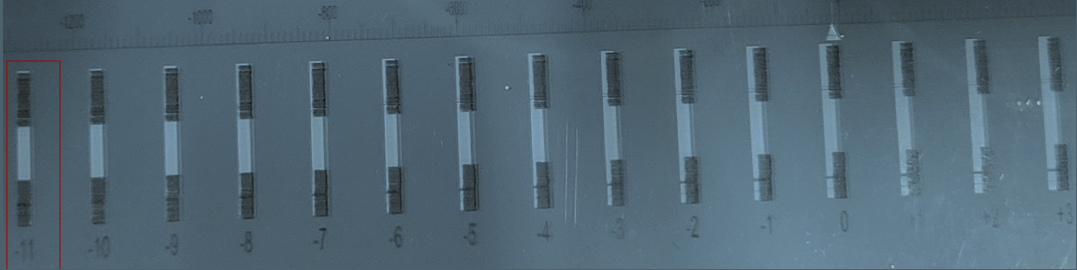
The goal is to have the best-aligned set of black & white bars in the 0 (zero) position. So, our takeaway from the evaluation of the test print is that the column with the best alignment is ‘-11’. - Now let’s return to the OmniDTF UI software’s Head Horz Distance Adjust section and note the current value of H2. In our screenshot from step #1 above, the value of H2 (for the Left Adjust line) is “9”. The number we got from evaluating the test print was ‘-11’, so we sum together ‘9’ (or ‘+9’, to be exact) with ‘-11’ and enter the result of ‘-2’ into the H2 field…

…then click the Save button. - Repeat step #1 above to print another test pattern. This should result in the best-aligned column sitting in the ‘0’ position.

With the 0 (zero) position of the test print showing the black & white segments in perfect alignment, the Printhead Horizontal Distance Adjustment (for the leftward motion, in this example) is now complete.
Right Horizontal Distance
The exact same process as the Left Horizontal Distance Adjustment is used to check and adjust the rightward motion alignment.
Follow the instructions from the above Left Horizontal Distance Adjustment section, substituting the Right Adjust button to run test prints and the Right Adjust H2 field to enter updates to that value, as needed.
Bidirectional
Our final task is to align the printheads during bidirectional printing (both left and right.)
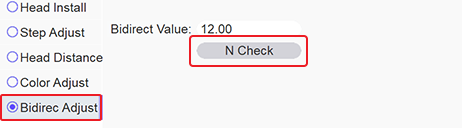
- Select Bidirec Adjust from the options on the left side of the OmniDTF UI program.
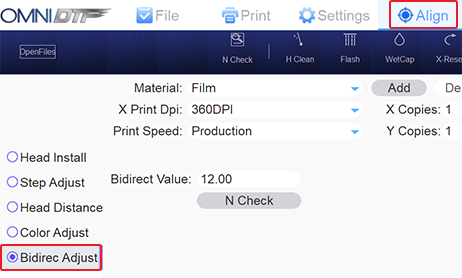
- Click on the N Check button to print a test pattern.
The Printhead Bidirectional Alignment Adjustment test pattern will print.
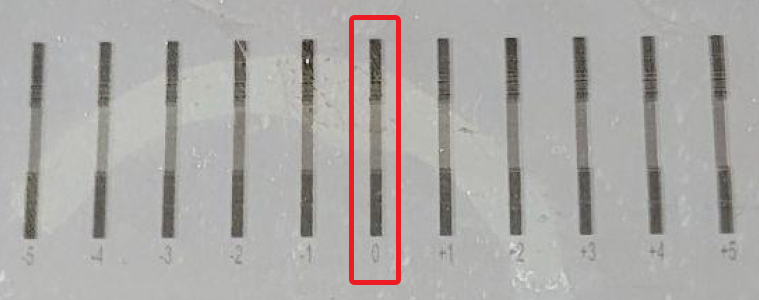
The vertical bar test pattern has top & bottom black segments and a grey middle segment.
Our task now is to identify the number under the test bar where the middle segment is best aligned with the top & bottom segments, creating a straight vertical bar with the right & left edges of each of the three vertical segments perfectly aligned.
In our example test print image above, the ‘+3’ column is vertically aligned.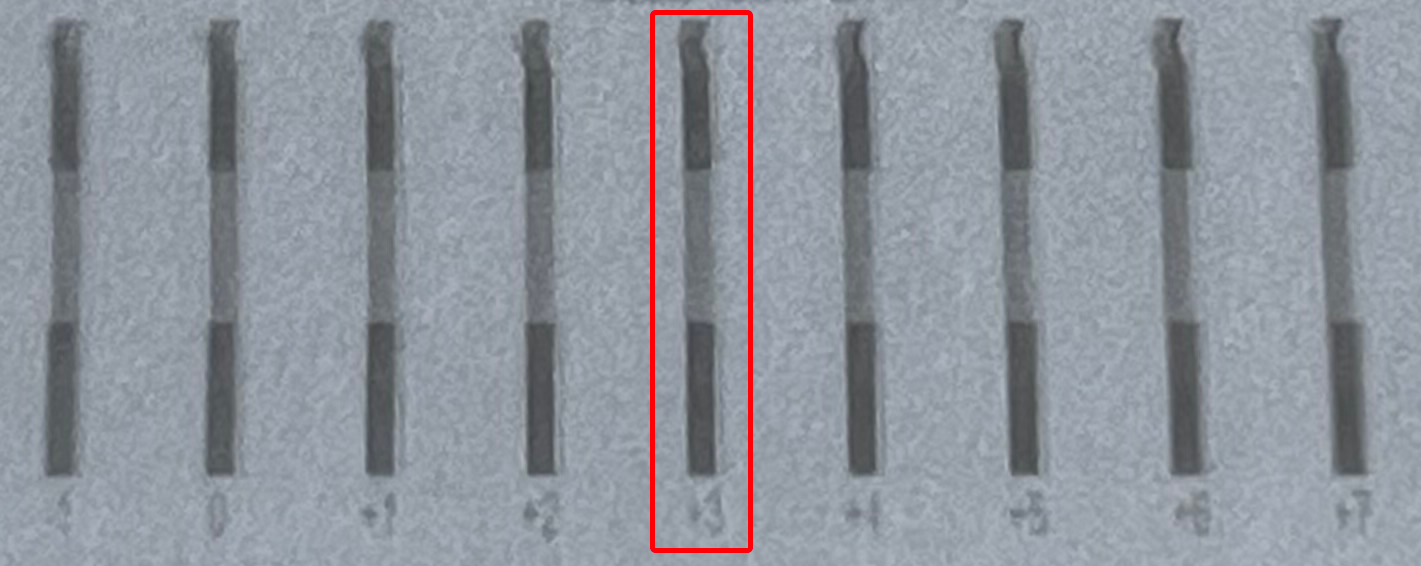
- Returning to the OmniDTF UI program, we take that value (‘+3’) and sum it with the number in the direct Value field (‘12.00’ in the above screenshot example.) 12+3=15, so we will replace the value of ‘12.00’ with ’15’.
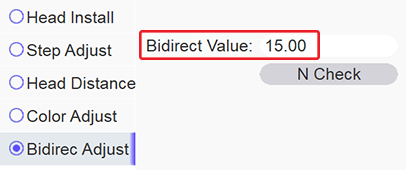
…and then click the Save button in the upper right corner. - Click the N Check button again to print another test pattern and confirm that the vertical segments are perfectly aligned at the 0 (zero) position.
With the 0 (zero) position of the test print showing the black & gray segments in perfect alignment, the Printhead Bidirectional Adjustment is now complete.
Wrap Up
Congratulations! If you’ve been following along on your OmniDTF printer while reading this article you have now completed all four printhead alignment processes: the Vertical Distance, Left Horizontal Distance, Right Horizontal Distance, and Bidirectional Adjustments.
Remember that these adjustments are each made with a specific Print Speed setting, so if you print using different speed selections at different times then you’ll need to repeat this process for each speed that you use.
Not finding what you need?
You can contact our technical support team by sending an email to support@omniprintonline.com with your company name, contact name, phone number, printer serial number, and a quick description of how we can help you.
This will automatically open a support case for you in our ticketing system and a technical support rep will follow up with you shortly.