April 22, 2024
Estimated reading time: 1 min
Transferring a finished print to a garment is simple and can be done immediately after DTF printing and curing, or up to a month later. Longer storage times may be possible if carefully stored in an air-tight container and in a climate-controlled environment.


- Prepare your heat press for a DTF image transfer.
Some materials may transfer best using parameters outside of these guidelines. Use the settings that bring the best results for your materials.
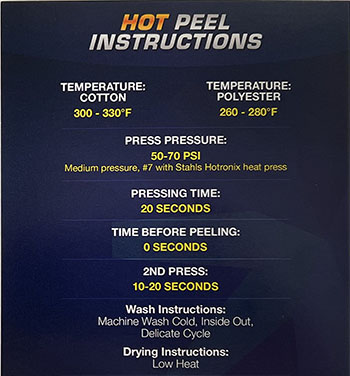
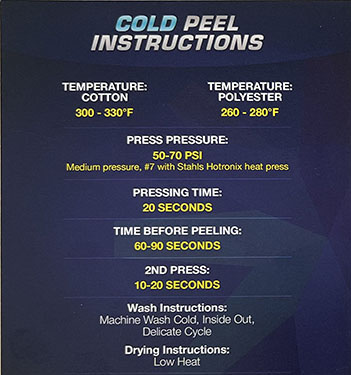
| Fabric Type | Temp (F) | Pressure | Transfer Press Time | Peel Delay (cold peel film) | Finish Press Time |
|---|---|---|---|---|---|
| Cotton | 300◦ to 320◦ | 50-70 PSI Stahl’s 5-7 | 20 sec | 60-90 sec | 10-20 sec |
| Polyester | 260◦ to 280◦ | 50-70 PSI Stahl’s 5-7 | 20 sec | 60-90 sec | 10-20 sec |
If you experience the film coating itself transferring to polyester or poly blend fabrics (example photo), try increasing the temperature to 300 and the transfer press time to 30-45 seconds.
- Cut out the image that you want to transfer to a garment from the film roll or sheet.
- Place the garment to receive the image transfer onto the heat press.
An initial pre-press of the garment prior to the transfer press can be helpful to remove any wrinkles and slight moisture in higher humidity environments.
- Place the DTF print on the garment, with the ink & glue side of the film directly against the fabric, positioned exactly where you want it transferred.
- Verify that the collar, shoulders, and any seams are draped off the side of the heat press to ensure proper pressure at the transfer location
- Place a silicone sheet or kraft paper on top of the film.
- Press the transfer onto the fabric using the above table for temperature, pressure, and duration.
- Remove the garment from the heat press, and lay it on a clean, flat, hard surface.
- When using cold peel film, delay this step for a minute or so, until the inked area of the garment has cooled down to room temperature. Carefully peel the film away from the garment at a moderate rate.
- Place the shirt back on the heat press with a sheet of parchment or Kraft Paper or a white silicone sheet between the shirt and the top of the heat press, then perform a final “finish” press for the duration shown above at the same temperature and pressure as the transfer. This further cures the surface of the print and creates a smoother transition between ink & fabric.
The transfer process is now complete!
You can leave feedback about this article:
Views: 3261
Not finding what you need?
You can contact our technical support team by sending an email to support@omniprintonline.com with your company name, contact name, phone number, printer serial number, and a quick description of how we can help you.
This will automatically open a support case for you in our ticketing system and a technical support rep will follow up with you shortly.
