Most print jobs are done by simply loading images into the RIP software, selecting an Environment, and configuring the size & position of the print. However, certain print jobs for some clients may require precise matching of color tints, tones, and shades — for example, when printing some corporate logos with very specific color associated with a brand.
Let’s first take a very brief, very high-level look at what’s involved in general color management. Then we’ll jump into a simple visual color matching technique to avoid getting into the weeds on things like PC display color profiling and gamut complications.
Color Management Overview
Color management is a deep and wide topic that involves specialized knowledge and tools to calibrate computer displays and other input & output devices, typically to the open standards of the International Color Consortium (ICC). The calibration process results in defining and applying the device’s ICC profile.
In digital graphics design and printing, precise color management requires that an ICC profile specific to each device in use be loaded into the software used to generate visual input (such as scanners and cameras) and output (such as displays and printers).
OmniPrint has done extensive print testing to generate ICC profiles for our printers to ensure accuracy to that standard for the color gamut supported by CMYK printing when using our inks and provided RIP software. The RIP software manages the gamut mapping from RGB to CMYK. However, along with the gamut differences, consumer-level displays aren’t necessarily well calibrated to an ICC profile. These technical details can sometimes result in colors that you see on your PC screen not exactly matching the color of your prints.
Fortunately, it isn’t necessary to become a color management expert or invest in display calibration tools to get accurate color matching. (A Wikipedia article linked below gets into much more detail on color management than we’ll get into here, if you’d like to dive in.)
Now let’s take a look at a technique that makes it straightforward to visually find the specific RGB values needed in your artwork to match the hues, tints, tones, and shades in a design.
Color Chart Printing for Color Matching
The color that ultimately matters to your customers is the color that is printed on the DTG-printed garments or DTF film that you deliver to them, of course. So what could be simpler and more accurate than having a set of color “swatch” prints that demonstrate exactly what a specific color will look like when printed onto a garment?
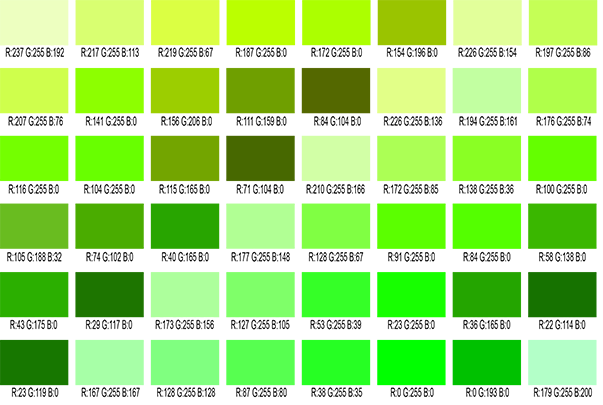
Once you’ve printed a color chart sample you can visually compare the printed colors to the target color to find the best match. Then use that color’s RGB values in your graphics software to print that exact color.
Color Charts
Each color chart is available in two versions: one for printing onto white and another for printing onto colored fabrics.
