Pressure / Hover Settings for each Timer
The Stahl’s Hotronix Hover Press has two timers built in, and each of the timers can be configured to apply pressure (with the amount of pressure defined by manually adjusting a knob) or to hover slightly above the platen when latched down.

Given those two options (pressure or hover) on each of two timers, there is a total of four possible configurations that you can set up, as follows.
| Pressure/Hover Setting Number | Timer #1 | Timer #2 |
| 001 | Pressure* | Pressure* |
| 002 | Hover | Pressure* |
| 003 | Hover | Hover |
| 004 | Pressure | Hover |
As shown above, timers 1 & 2 can be set to both use pressure (setting #001), to both use hover mode (setting #003), or to use a combination of pressure and hover (settings 002 and 004).
The only difference between 002 & 004 is which of the two timers gets pressure and which hovers — the 1st or 2nd timer. Either way, in those two settings the unit will alternate between pressure and hovering.
How to Change Setting Numbers
Changing the pressure/hover setting for either or both of the timers requires that we first turn the heat press off, then follow specific steps using the control pad to select the setting number for the pressure/hover setting we want for each timer using the following steps.
- Turn off the heat press.
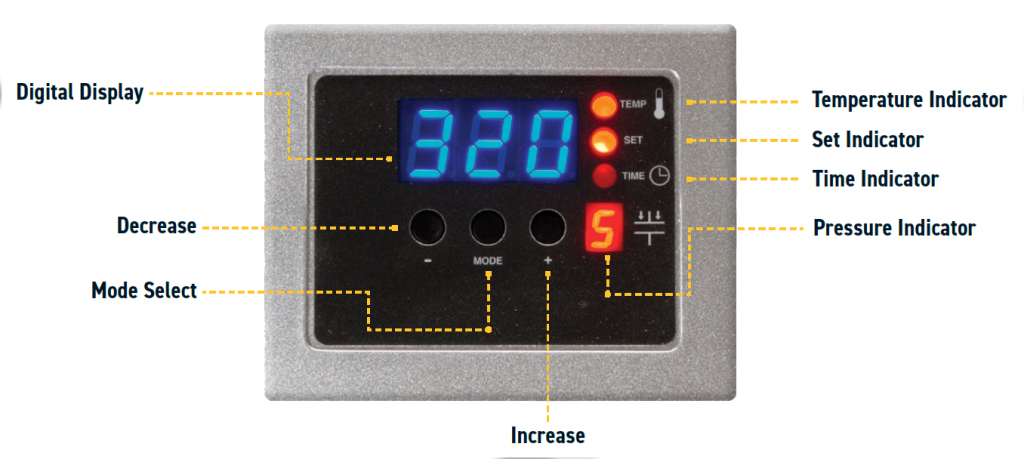
- Press and hold both the ‘-‘ (decrease) and ‘+’ (increase) buttons on the control pad.
- Turn on the heat press while holding the ‘-‘ and ‘+’ buttons for 3-5 seconds longer.
- Press the ‘Mode’ button. Confirm that the number 555 appears on the display.
- If ‘555’ doesn’t appear, go back to step 1 after confirming that you have a Hotronix Hover Press, not an Auto Open Clam or other model or brand.
- After ‘555’ appears on the display, press the ‘Mode’ button again.
- Press the ‘-‘ or ‘+’ button to cycle through the pressure/hover mode number (001 – 004), as shown above, selecting the number for the pressure/hover combination that you want.
- Once you’ve selected the desired pressure/hover mode for the two timers, press the ‘Mode’ button two time to exit the pressure/hover selection mode.
You will now be in the regular temperature selection mode, where you can change the temperature setting and use the ‘Mode’ button to cycle through the timer settings and back out to operating mode.
Not finding what you need?
You can contact our technical support team by sending an email to support@omniprintonline.com with your company name, contact name, phone number, printer serial number, and a quick description of how we can help you.
This will automatically open a support case for you in our ticketing system and a technical support rep will follow up with you shortly.