Properly mounting garments onto the platen is important to prevent movement of the garment during the printing process and ensure that your prints are straight with no distortion.
Use the patented TucLoc(R) feature to secure the garment in place, but avoid stretching the fabric when tucking it in. Printing on a stretched shirt can distort the printed design when the fabric is released from the platen.
The below video provides a brief overview of the mounting process.
The below video explains the purpose and mechanics of pretreatment, including valuable pro tips about garment quality, pretreatment troubleshooting, and pretreat equipment placement and maintenance.
DirectRIP provides a wealth of options for how you’d like to print your image, to allow you maximum control over your products. This article will discuss how to select, import, and set up an image for Freejet 330-series printing in DirectRIP.
Format Considerations
No matter how high-quality the shirt, and how perfect the pretreatment job, there’s no amount of technical tweaking that can turn a bad image into a good print. Before you get started with setting up the print, you’ll want to make sure that you’re working with a properly formatted image that will yield satisfactory results! If you need guidance on how to create and format a proper print image, please follow the guidelines contained in this knowledgebase article.
Importing Your Image
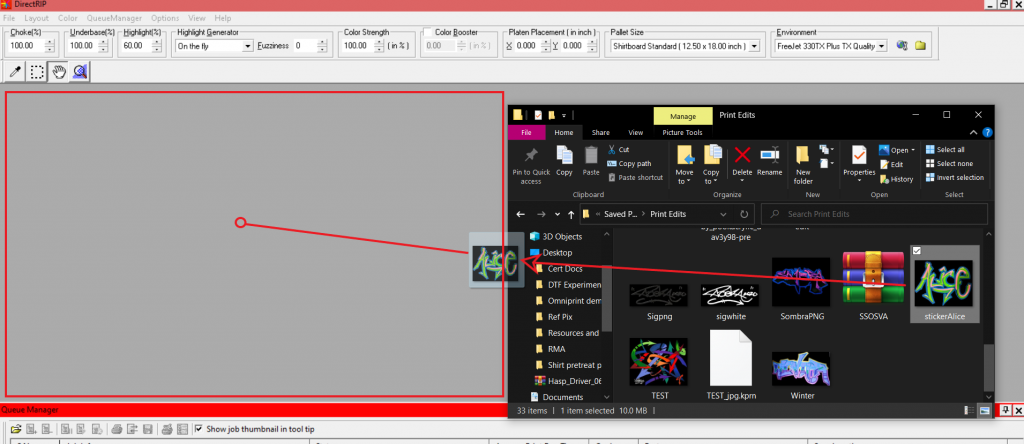
DirectRIP makes importing your image a snap! You can either use the ‘File’ menu option on the top-left corner of DirectRIP , or simply click and drag any compatible image from Windows’ File Explorer into the gray space in the center of DirectRIP!
File import (open image file in DirectRIP)
To make sure your images print at your expected size, there should be very little “negative” or dead space (transparent content) along the borders of your image, to give a more precise projection of the artwork’s dimensions. Otherwise, the printed image itself will be reduced in size by the amount of transparency at the edges of the image. This would typically be handled during image creation in a tool like Photoshop or Corel Draw, but DirectRIP can be used for simple, rectangular cropping, too.
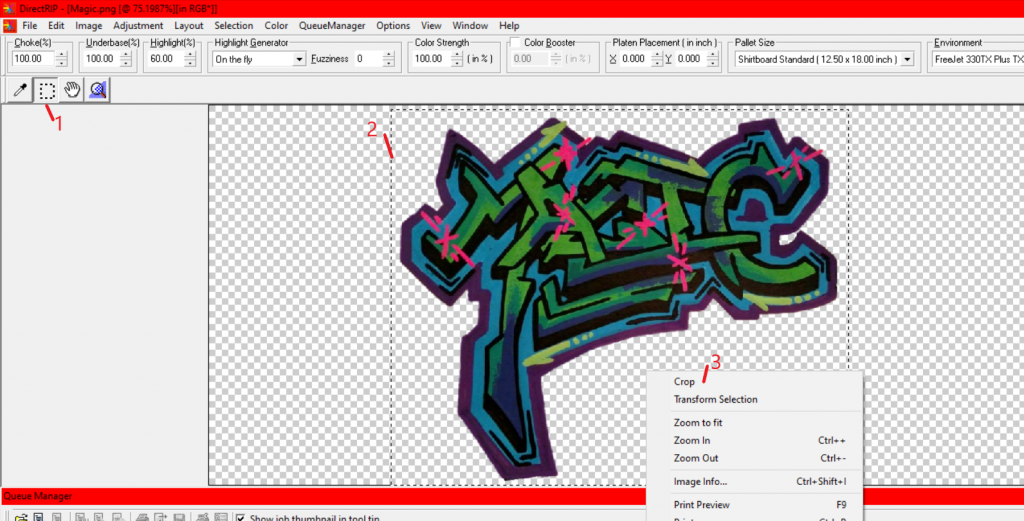
Steps to crop an image in DirectRIP
To crop the image in DirectRIP:
Click the Selection tool. It is the dashed box near the top-left of the image window.
Click & drag to draw a selection box around the parts of the image that you want to keep.
Right-click the image and select Crop from the pop-up menu to make the crop.
Using DirectRIP’s crop feature does not edit your original image file. It creates a new, temporary file of the cropped area to be used just for the current print job. To create a permanent crop to your image, edit it in your image creation software.
Configuring Your Print
Now that your image has been loaded and properly cropped to size, you can begin your setup process. The first step of any print configuration is to choose your Environment. Your choice of Environment will depend on two or three factors, depending on your printer model:
Expected (based on artwork) or desired print quality
Color of fabric being printed on
Type of fabric (Freejet 330TX PLUS model only)
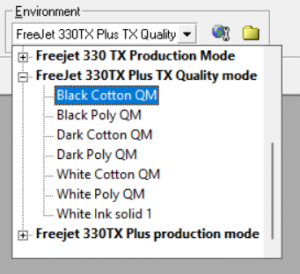
In the Environment drop-down box, select the Environment Group and Environment which corresponds with the desired type or quality of your printed image.
Environment selection
Once you have selected an Environment, most of the heavy lifting of setting up the print is already complete and all that’s left is for you to size and place your image! Next, turn your attention to the QRip subwindow:
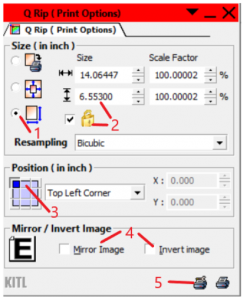
Q Rip subwindow
In the Size section of the Q Rip subwindow, select the third radio button from the top, to enable resizing of the image.
Make sure the checkbox to the left of the padlock icon is checked to lock in the original aspect ratio of the image (preventing distortion of the horizontal & vertical proportions), then resize as desired.
When resizing images, remember that if you upscale the image to print at a size larger than the design then your image quality will be degraded. The larger the percentage of upscaling, the more the quality will be reduced. Creating artwork designs at or larger than the dimensions to be printed is recommended.
Select the desired positioning of your image on the garment. This should be Top Center unless you’re doing something specific which requires some other print positioning.
Note the Mirror and Invert image options, which are typically not used. Mirror Image will print the design backwards, which is useful for Direct-to-Transfer (DTF) printing, or anytime you want to reverse the horizontal axis of your image. Invert Image will print your image’s photonegative — a dramatic effect seldom needed, but available.
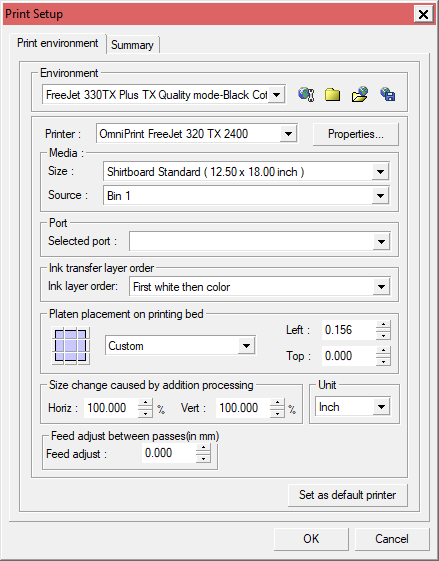
Locate the two printer icons on the bottom right corner of the QRip subwindow. The icon on the left is the Print Setup icon. Click it to open the Print Setup window.
Print Setup
Note that the Platen placement on printing bed setting should never be changed. It has a completely different purpose than the Position setting in the Q Rip window, even though both settings are presented with the same 3×3 grid.
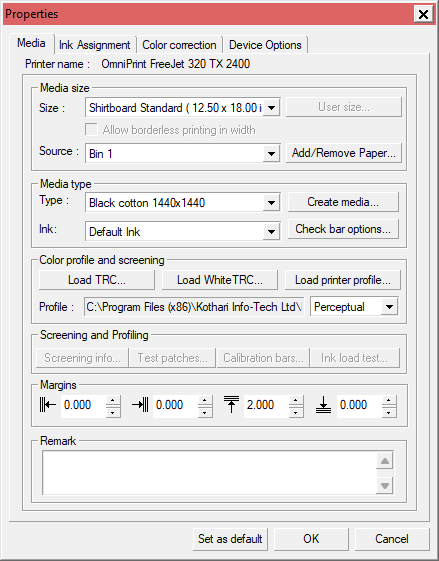
In the Print Setup window, select “Epson Stylus Photo R2400” from the Selected port dropdown box, then click the Properties button to pull up the Properties window.
Print Setup — Properties window
In the Properties window’s Margins section, set each desired margin. These margins set print position offsets from the justification setting previously selected in the QRip window. Each of the four arrows point to the side from which the margin can be set. For example, the 3rd box with the upward-pointing arrow indicates setting a margin from the top.
It’s a common practice in DTG printing (and garment printing, in general) to leave a 2″ margin down from the collar before printing the design.
Note that the dimensions of any margins selected are added to the dimensions of the print, as previously configured in the Q Rip windows, and the total must not exceed the dimensions of the print area — 12.5″ x 18″ on the Standard Adult platen. So, if you will be adding a 2″ top margin then the height of your design must be 16″ or less, as configured in the Q Rip window.
Click ‘OK’ to finalize the Properties settings and close that window, then click ‘OK’ again on the Print Setup window to close it and save the settings.
Final Preparations
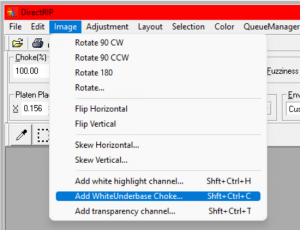
If you’re using the Dark or Black environments on a 330TX Plus, or the Color or Black environments on the 330TX, DirectRIP will generate a White Underbase. Since white ink may slightly expand when it lands on a garment, we will need to slightly restrict the edges of the underbase to compensate and ensure that there won’t be an unintended white “halo” around the edges of the printed design. To do this, select the Image menu near the top left corner of DirectRIP, then select ‘Add WhiteUnderbase Choke’ from the menu — the second-to-last option on the list.
Add white underbase choke
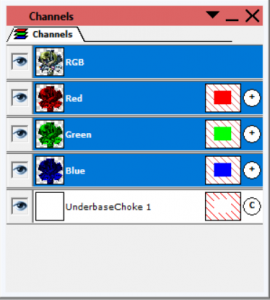
Click ‘OK’ on the dialogue box that appears to accept the default of 2 pixels for the white underbase choke, then confirm that “UnderbaseChoke 1” has appeared in your Channels Palette.
Channels, with white underbase choke
At this point, the design is technically ready to print. But, you always want to be careful and make sure it has been formatted correctly! To check your work, right-click your image and select Print Preview.
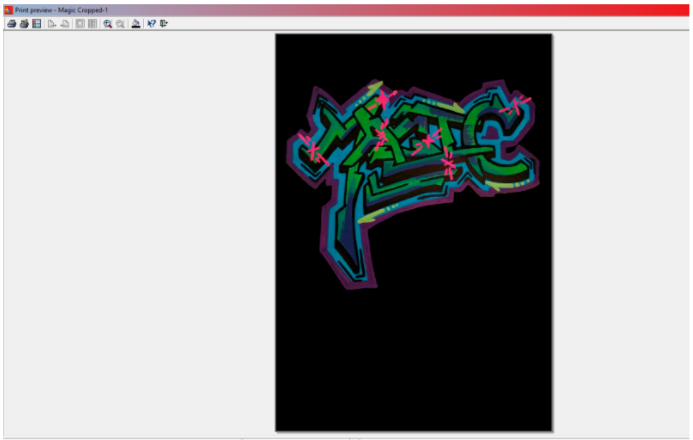
Print Preview
The image displayed in Print Preview is proportionally accurate to the way your design will look when printed on the 12.5″ x 18″ Standard Adult Platen. You can reasonably expect the design to appear on the print surface the same as it appears on this screen. To make sure you get the most accurate comparison, select the fill bucket icon (3rd from the right among the icons at the top of the screen) to change the background color to match your garment or print surface.
If everything in the preview looks solid, tap the Esc key on your keyboard to exit Print Preview mode.
DirectRIP print job setup speedrun
Starting the Print
Once your print job is completely configured, you’re ready to print! Run through the following checklist to make sure everything else is properly set up:
Is the platen properly mounted on the printer and flush against the alignment rails?
Is a pretreated garment mounted smoothly and securely on the platen?
Have you properly adjusted the platen height?
Is the gantry in the Print Ready (fore) position?
If you can answer “Yes” to all of these questions, you’re good to go!
As you can see, there are a few steps to configuring prints in DirectRIP, but the process is not complex and can be completed within a minute if your graphic is ready to go. Once you’ve performed a few prints, you’re sure to get it down to muscle memory in no time.
All good quality prints begin with good quality artwork. The best quality shirts, perfect pretreat application, and excellent inks & printers cannot correct problems with the actual image being printed.
Image Creation Guidelines
Aesthetic qualities aside, there are a few important considerations when creating or sourcing any artwork for DTG & DTF printing.
Transparent background: Unless you want a rectangular print for creative reasons, be sure to make the background transparent. This will not only make the subject of your artwork pop visually, it will also save all the ink that would otherwise be used to print the background.
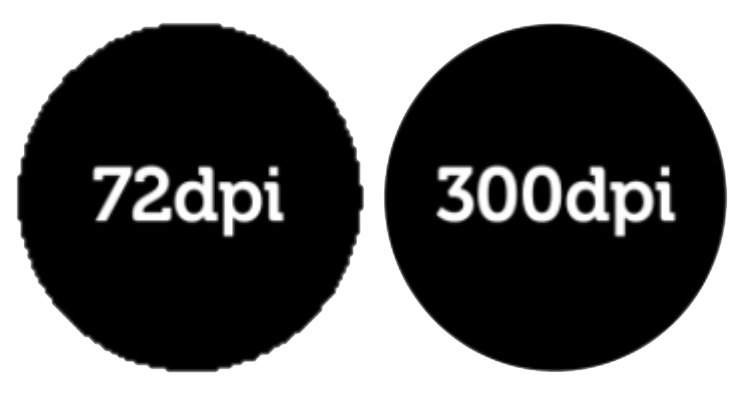
300 DPI resolution: The higher the resolution of your artwork, the better your print can look. We recommend using 300 DPI to avoid jagged edges on curves.
Size artwork to desired print size: Expanding or zooming in on artwork causes jaggy curves, so create your designs at the size you’ll be printing or larger.
PNG: Our recommended file format is PNG for storage efficiency (with lossless compression) and support for transparent backgrounds & opacity. TIF, PSD, JPG, GIF, and other formats also work with our DirectRip software, but PNG has the best combination of features, is most commonly used, and is widely supported by graphics creation & editing software.
RGB: Yes, your printer uses four-color CMYK inks, plus white for the underbase and highlights. However, the DirectRip software is optimized to convert the RGB colors commonly used for PC computer graphic work to CMYK+W when printing. So we recommend using RGB for your design.
Working with Customer-Provided Images
Customers may request that you print a design that they provide to you as a graphic file. This in itself is not a problem, but it’s important to check the parameters of their designs and let them know proactively if you have quality concerns. As mentioned above, make sure any file you accept is 300 DPI and sized appropriately for the size of print they want to have.
Downsizing is easy & quick to do in DirectRip, so oversized images are fine. But images that are much smaller than the desired print size will not result in the quality of print that you want associated with your DTG printing business.
The same goes for use of clip art or images saved from the Internet. Make sure they’re designed for larger format printing using the parameters referenced above.
Your printer can produce incredible quality prints! Don’t let your reputation for quality printing take a hit due to poor quality source graphics.
One of the first skills that we get asked about after people fully grasp the concepts of printing on their Freejet printers is how to achieve more vibrant color on their prints – the way that the image appears on the screen might just not translate to colors that really “pop” when they get onto the T-shirts themselves.
While our typical first concern is to double-check the pretreating process (it simply cannot be overstated that the majority of print issues stem from improper pretreatment), sometimes even on an impeccably pretreated, 100% ringspun, combed cotton, black T-shirt, we just can’t get the image to print the colors that are meant to have high-impact on the eye. It happens, right?
Luckily, there is a convenient, if slightly more expensive, solution to this problem. The Freejet is capable of doubling the resolution of the white underbase layer, laying down nearly twice the amount of ink on the base, ensuring that the top, color layer comes out looking super-vibrant! Best of all, it’s a trick that only takes a few extra steps!
If you’d like to try it, pretreat a dark or black t-shirt, mount it onto a platen, and follow along with the below steps.
First, set up your image as usual. Environment, Sizing, Placement, Margins, White Underbase Choke… all of it, exactly as you would for any other print job. Once you’ve gotten all the way ready to print, make the following changes:
Access the ‘Print Setup’ window by clicking on the leftmost of the two printer icons near the bottom right corner of the QRip window
In the ‘Print Setup’ window, click ‘Properties’
On the ‘Properties’ window, click over to the ‘Device Options’ tab, and verify the current layer displayed in the drop down box is the ‘White Underbase’
Find the field labeled ‘Resolution’, and change it from the default of ‘1440×1400‘ to ‘2880×1440‘. Then click ‘OK’ to save and exit the Properties window, then click ‘OK’ again to get out of Print Setup.
Next, find the ‘Underbase(%)’ field, in the toolbar typically near the top left of your DirectRip window. Reduce the value from 100% to 92%. This will keep the Freejet from flooding the shirt. We’re trying to increase the ink flow, but not drown the shirt!
Put your Freejet into Layer Setting ‘A’. This will cause the printer to pause and wait for our input after printing the white underbase. We do this because want to give the underbase time to set before we print colors on the second layer. Otherwise, we risk bleeding white ink into the color layer.
Finally, hit Print! The printer will take much longer to print the White Underbase Layer, and use nearly twice the amount of white ink as normal. (When the print job is complete, check ‘Job Info’ in the Queue Manager for the complete details of ink usage.)
Once printing of the underbase is complete, give the print a while to rest. You don’t want to print the top layer until the underbase has lost most of the shiny liquid lustre. It will appear a bit flatter once it has sufficiently settled. Next, tap ‘Stand-by’ to reset the gantry to the Print Ready position and begin printing the color layer.
Once the print is complete, gently remove it from the printer, and place it on your heat press. However, before you press it (2 times for 90 seconds at low pressure — pressur setting ‘1’ on a Stahl’s heat press), hover the top of the heat press over the garment for 30 seconds to give the ink a little time to start the curing process.
Lastly, press the garment in accordance with normal Ink Curing standards for your shirt.
Check out the results! With the right artwork, Double White Underbases can create a dramatic effect, to impress your clients at only a slight increase in cost!
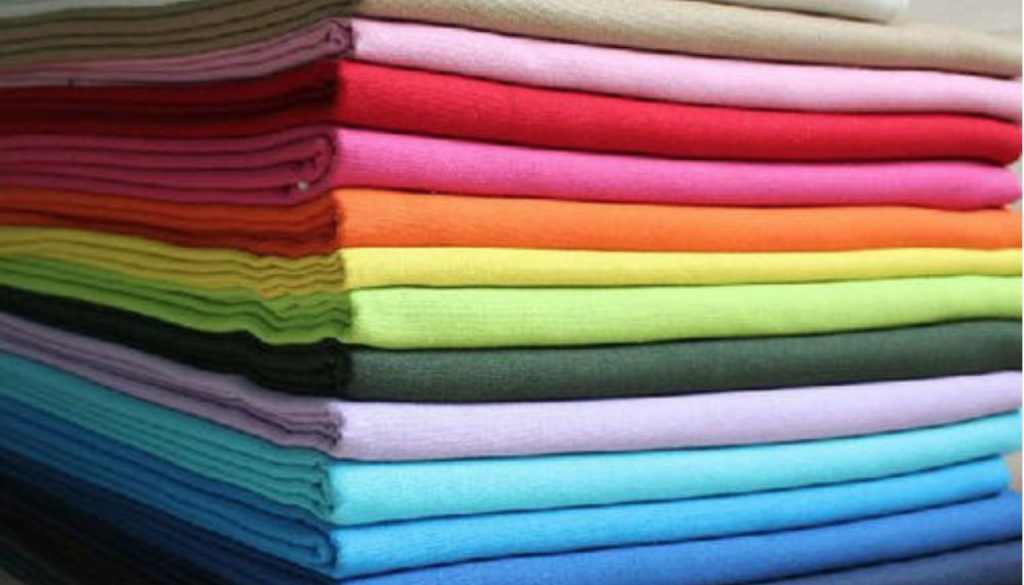
When choosing a garment for DTG printing the most important factor will be the quality of your garment. High-quality garments will produce high-quality results, while low-quality garments will produce poor results. And since OmniPrint’s DTG ink is water-based, certain fabrics interact better with the pretreatment, ink, and fabric.
We recommend experimenting with various fabrics by a variety of manufacturers to see which garments work well with your graphics. Typically, DTG printing works best on natural fabrics and natural-synthetic blends. It will take practice to find the right pretreat amount based on the fabric type, fiber content, and amount of pretreat. Here are some general guidelines to consider:
Garments with loose weaving may allow pretreatment to migrate away from the top of the fabric, resulting in spotty prints and poor washability
Cheaper than average garments should be a warning of low quality
Rayon or spandex dominant blends tend to scorch when curing the ink so should be avoided
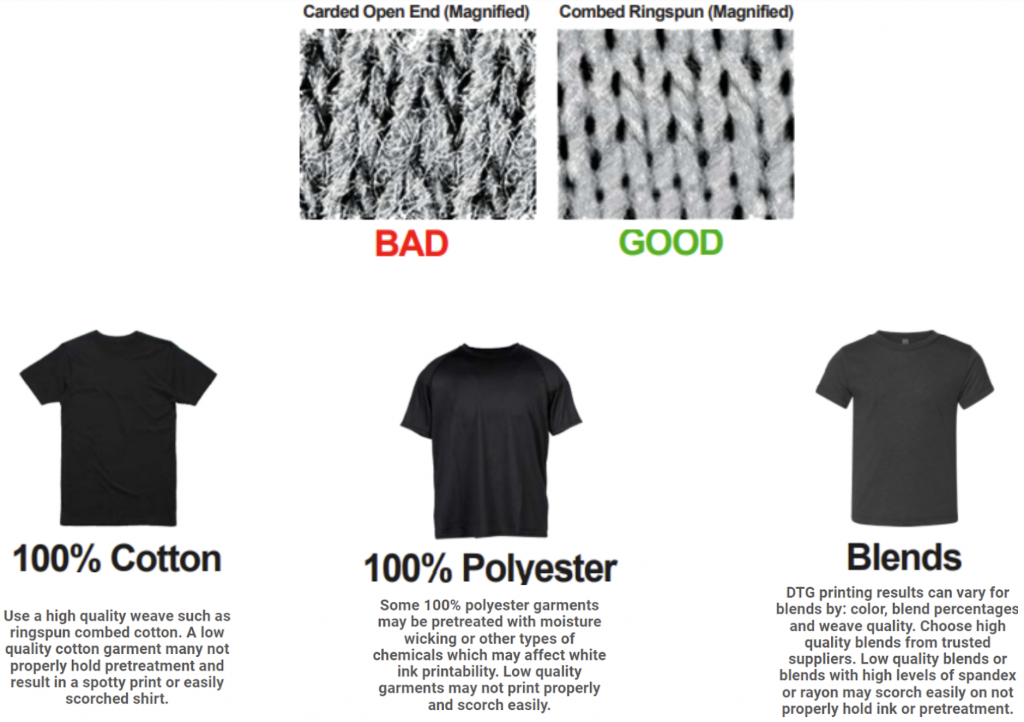
Avoid Carded Open End and garments with too many stray fibers
Combed Ringspun 100% Cotton is the preferred garment choice
The 330TX model can print on up to 50% polyester
The 330TX PLUS model can print on 100% polyester
Once you have considered and optimized these factors you can print on:
It is important to maintain a temperature range of 60° to 80° Fahrenheit and a Relative Humidity range of 45% to 65% to avoid negatively impacting:
Print quality
Proper consistency of ink and pretreatment
Shelf life of ink, adhesive powder, and pretreatment
Service life of print head
How does the environment impact print quality?
If the humidity is too high, fabrics can absorb and retain moisture, causing ink to bleed. We recommend doing a final heat press on any garment that was previously pretreated to steam out any moisture and remove any wrinkles.
How does the environment impact ink and pretreatment?
The shelf life of our inks and pretreat material is normally one year, but temperatures exceeding 80° Fahrenheit can cause the consistency of inks and pretreatment to permanently change, whether in the equipment or still in their original containers. If this happens the nozzles of the print head or pretreat device may clog, so the material should be replaced to avoid damaging your equipment.
How does the environment impact the service life of the print head?
If the humidity is too low atomized ink can dry on the print head plate and cause clogging. Also, if temperatures exceed 80° Fahrenheit the consistency of the ink can permanently change and result in clogging print head nozzles, potentially requiring that the print head be replaced.
Clogging of the print head due to temperatures or relative humidity outside of the recommended ranges is not covered by your printer’s warranty.