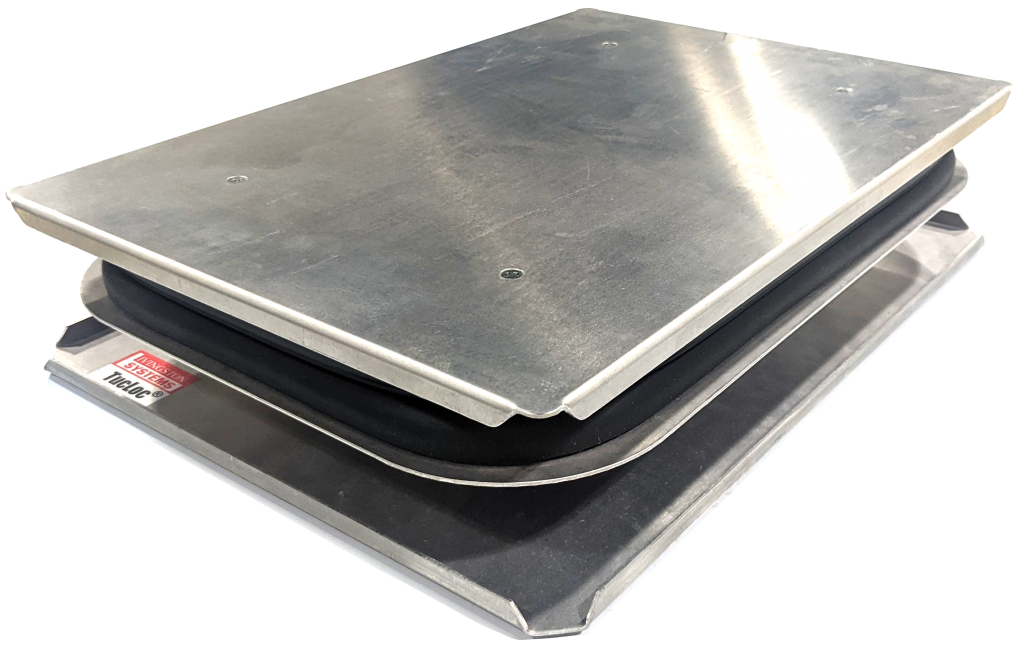
Properly mounting garments onto the platen is important to prevent movement of the garment during the printing process and ensure that your prints are straight with no distortion.
Use the patented TucLoc(R) feature to secure the garment in place, but avoid stretching the fabric when tucking it in. Printing on a stretched shirt can distort the printed design when the fabric is released from the platen.
The below video provides a brief overview of the mounting process.
The daily startup routine for the OmniDTF system is very straightforward and can be made even simpler by following a few tips that we’ll include in this brief overview of the process.
Preliminary Steps
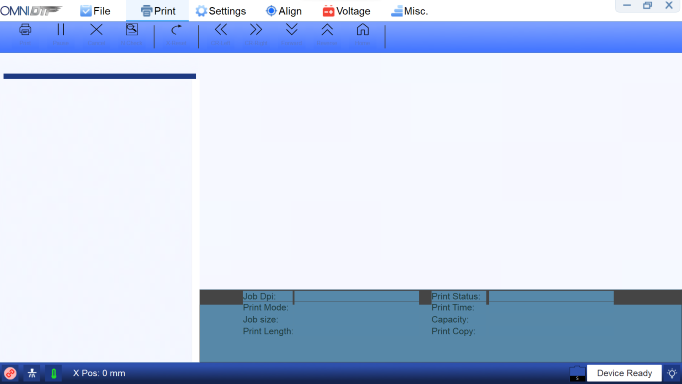
Before starting up the printer, first start up the OmniDTF UI program on your PC, in order to automatically load configuration data when the printer is turned on.
Note that the connection icon in the lower-left corner of the window will flash red until the printer is turned on.
Also, empty the waste ink bottle at the right-rear corner of the printer (left if viewing from the back) if it contains any ink before turning on the printer.
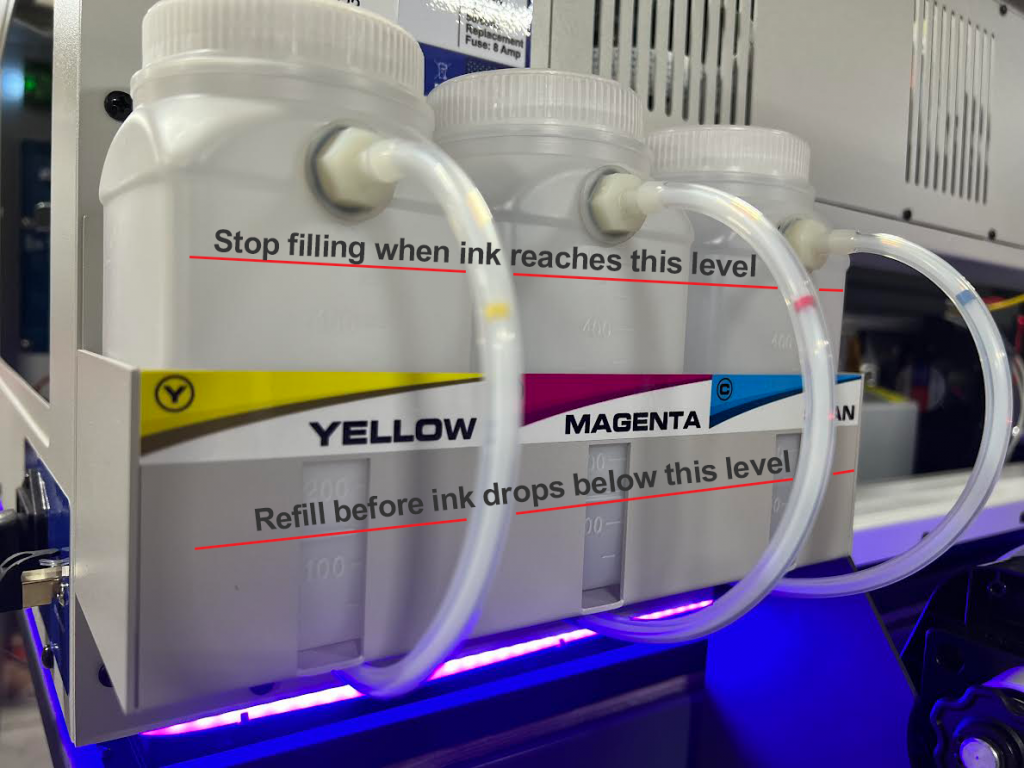
Always check your ink levels before printing and fill the bottles to the level shown above. Be careful not to overfill the bottles because if the ink level reaches the bottle’s fitting where the ink tube enters the bottle as this can cause leakage.
It’s important to never let the ink level in the bottles get below the refill level shown above to maintain good ink flow and avoid getting air into the ink lines.
If the printer has been idle for longer than two days or if the white ink is not opaque, shake the white ink bottles vigorously (while covering the holes in their lids) for 15-20 seconds. Then wait for at least 15 to 30 minutes to allow the white ink to settle before starting up the printer and running the routine white ink circulation.
When finished, use a clean cloth to wipe away any ink that appears to be blocking the breathing holes in the center of the bottle caps.
The final step before turning on the printer is to confirm that the white ink lines are clipped shut. This should already be shut since that is an important step of the shutdown procedure, but it’s advisable to double-check now.
Starting up the OmniDTF printer
Start-up video demonstration
Step-by-step instructions
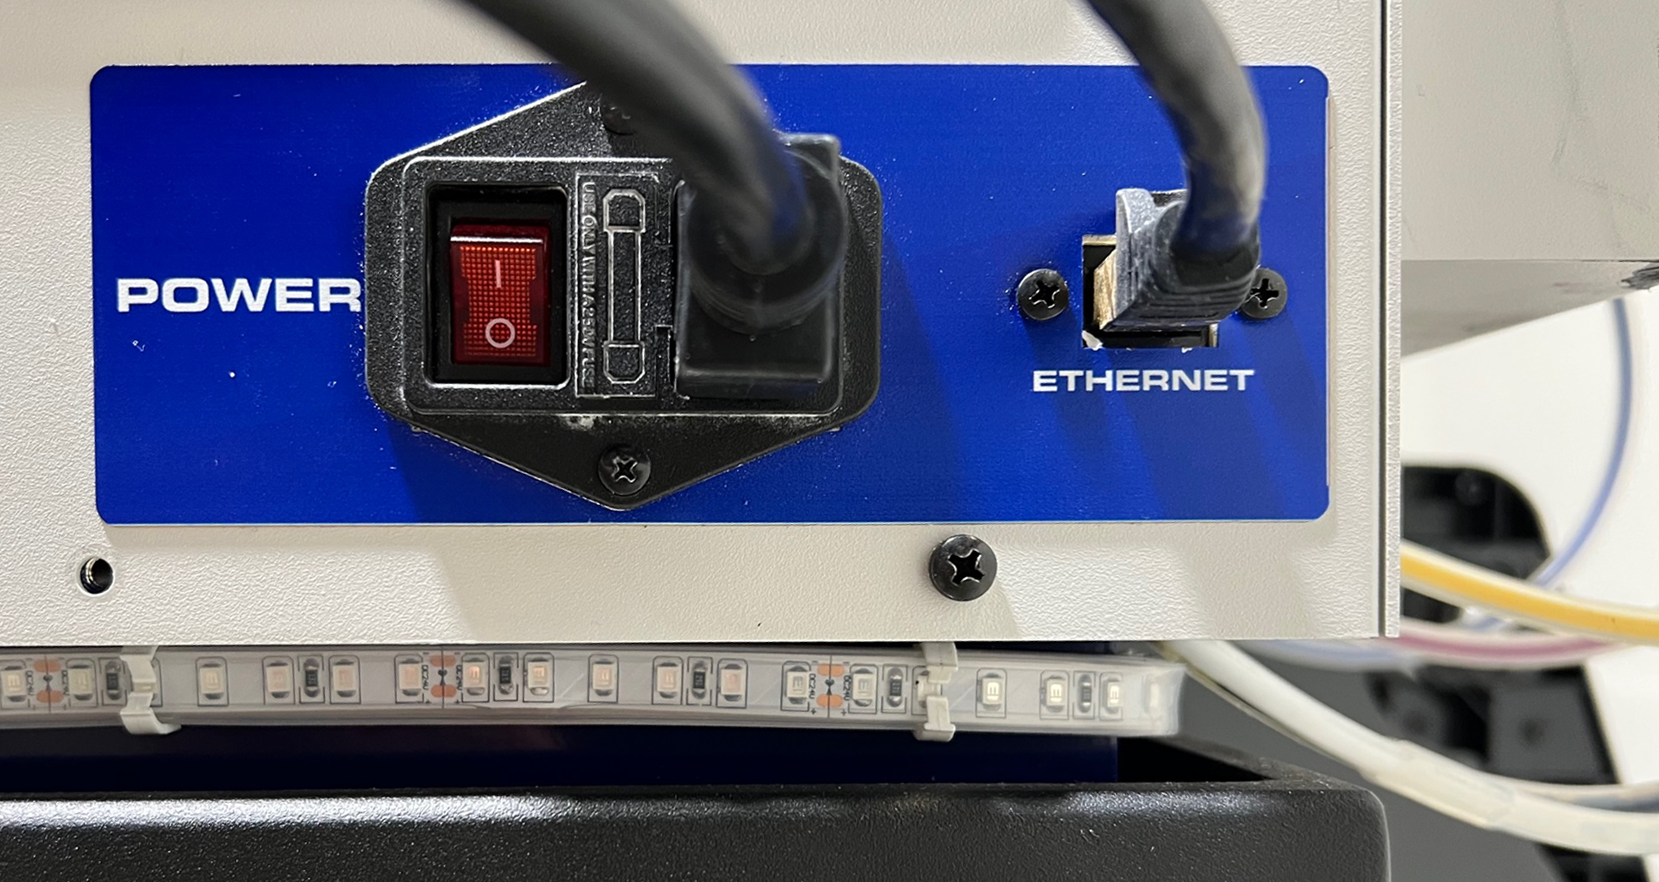
Turn on the printer using the power switch on the right side, near the back.
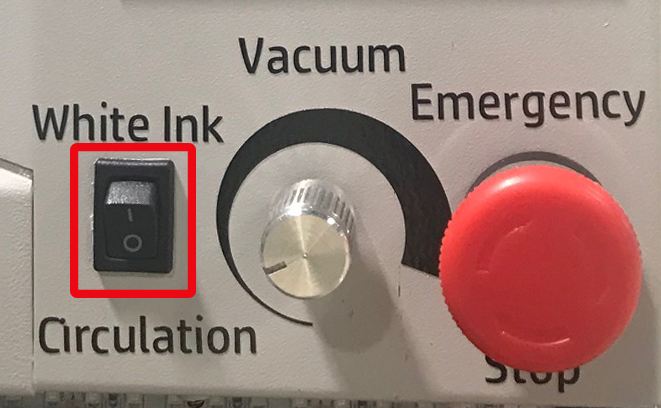
Circulate the white ink by turning on the White Ink Circulation switch on the front of the printer if it isn’t already on. You will hear it running for 3 minutes when switched on, and will then automatically turn off.
Confirm that the rotary Vacuum switch, shown above, is on (not fully counter-clockwise.) It’s recommended to keep this at its minimum strength, which provides plenty of vacuum power to keep the film against the platen without cooling the platen heaters.
The White Ink Circulation and Vacuum switches can be left in their ON positions at all times. Then they will automatically engage when the printer is turned on.
After the white ink circulation pump has stopped running, open all eight of the ink clips
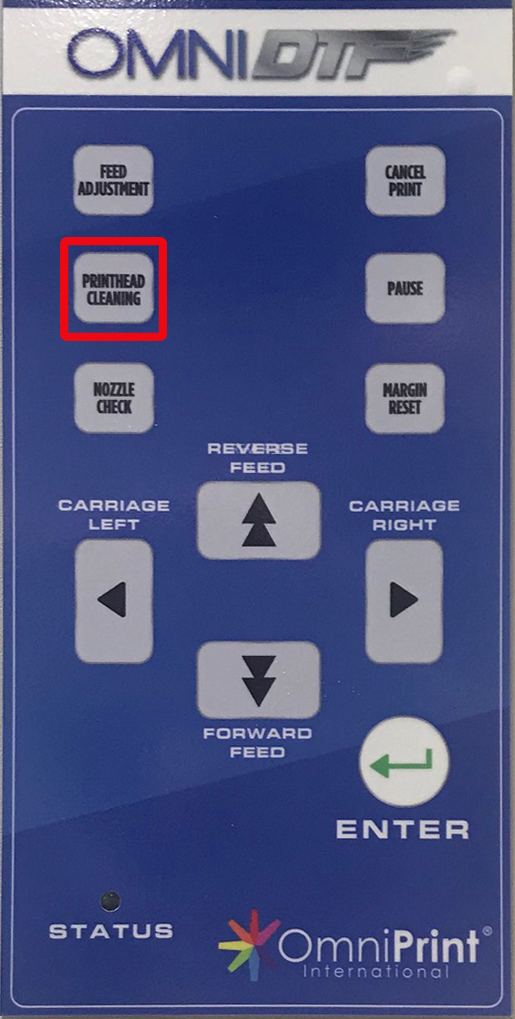
Press the Printhead Cleaning button on the printer’s control pad to run a head clean.
Once the control pad display indicates that the head clean is finished, press the Printhead Cleaning button once more to run a second head clean.
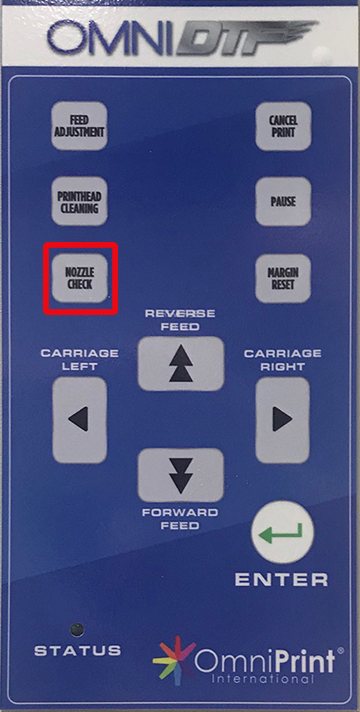
Press the Nozzle Check button on the printer’s control pad to print a nozzle check test pattern.
If the nozzle check isn’t at least 90% complete on all 8 channels, additional Printhead Cleaning should be done to achieve that standard.
Be careful to keep an eye on the fluid level in the waste ink bottle if running multiple head cleans, and be sure to empty it before it gets beyond 2/3 full.
Confirm that there is an appropriate amount of DTF Powder at the bottom of the U-shaped loop of film in the dusting chamber and add more as needed.
Turn on the curing oven assembly’s main Power switch, along with the Curing switch to begin heating the oven.
The previous oven settings will be retained so typically won’t need to be adjusted as part of the daily startup process.
If the film in the oven is being heated excessively and warping, keep the film moving through the oven by continuing to print, or lift the oven’s lid open when the printer is idle.
The printer is now ready and you can proceed with production work!
Production Notes
Monitor the status of the following items periodically when printing to ensure trouble-free operation and optimal print quality:
Film Alignment: Confirm that the film runs straight through the printer, across the bridge, and through the oven assembly. Center it with the yellow stickers’ alignment lines and at the opening to the Dust-Curing Machine where the bridge rests. Pause printing and adjust as needed to correct any skewing.
Powder dusting: Activate as needed to maintain sufficient powder on the film.
Powder shaking: Adjust as needed to effectively remove excess powder.
Waste ink bottle: Monitor the level before running a head clean and empty the bottle before it exceeds 2/3 full.
Ink bottles: Refill before the level drops to 1/2 full to maintain optimal ink flow and prevent air from entering the ink lines.
Powder: If the powder dispenser supply is depleted, briefly pause printing and refill the supply.
DirectRIP provides a wealth of options for how you’d like to print your image, to allow you maximum control over your products. This article will discuss how to select, import, and set up an image for Freejet 330-series printing in DirectRIP.
Format Considerations
No matter how high-quality the shirt, and how perfect the pretreatment job, there’s no amount of technical tweaking that can turn a bad image into a good print. Before you get started with setting up the print, you’ll want to make sure that you’re working with a properly formatted image that will yield satisfactory results! If you need guidance on how to create and format a proper print image, please follow the guidelines contained in this knowledgebase article.
Importing Your Image
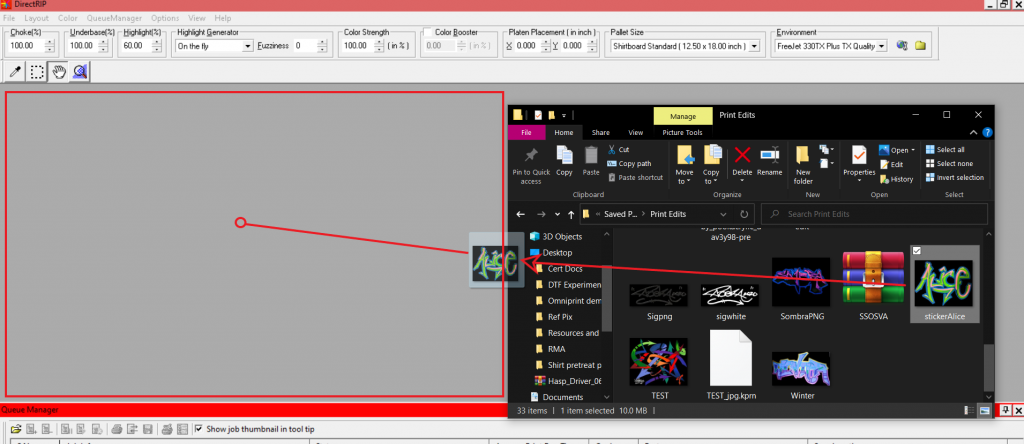
DirectRIP makes importing your image a snap! You can either use the ‘File’ menu option on the top-left corner of DirectRIP , or simply click and drag any compatible image from Windows’ File Explorer into the gray space in the center of DirectRIP!
File import (open image file in DirectRIP)
To make sure your images print at your expected size, there should be very little “negative” or dead space (transparent content) along the borders of your image, to give a more precise projection of the artwork’s dimensions. Otherwise, the printed image itself will be reduced in size by the amount of transparency at the edges of the image. This would typically be handled during image creation in a tool like Photoshop or Corel Draw, but DirectRIP can be used for simple, rectangular cropping, too.
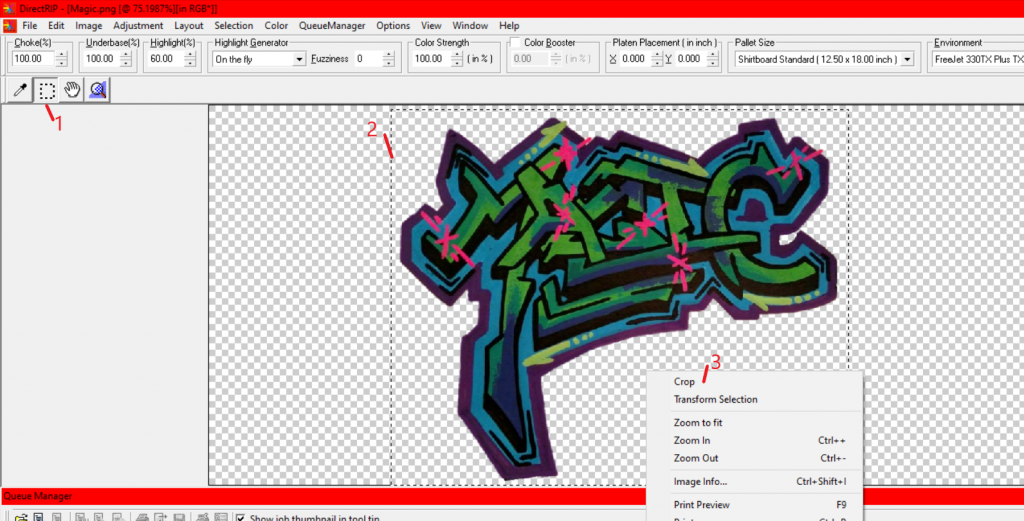
Steps to crop an image in DirectRIP
To crop the image in DirectRIP:
Click the Selection tool. It is the dashed box near the top-left of the image window.
Click & drag to draw a selection box around the parts of the image that you want to keep.
Right-click the image and select Crop from the pop-up menu to make the crop.
Using DirectRIP’s crop feature does not edit your original image file. It creates a new, temporary file of the cropped area to be used just for the current print job. To create a permanent crop to your image, edit it in your image creation software.
Configuring Your Print
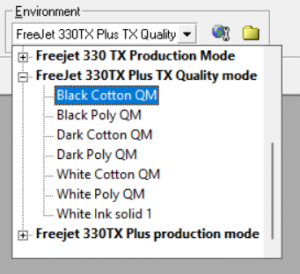
Now that your image has been loaded and properly cropped to size, you can begin your setup process. The first step of any print configuration is to choose your Environment. Your choice of Environment will depend on two or three factors, depending on your printer model:
Expected (based on artwork) or desired print quality
Color of fabric being printed on
Type of fabric (Freejet 330TX PLUS model only)
In the Environment drop-down box, select the Environment Group and Environment which corresponds with the desired type or quality of your printed image.
Environment selection
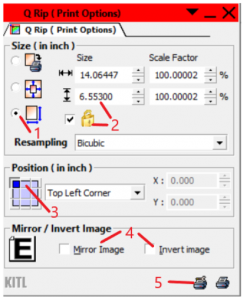
Once you have selected an Environment, most of the heavy lifting of setting up the print is already complete and all that’s left is for you to size and place your image! Next, turn your attention to the QRip subwindow:
Q Rip subwindow
In the Size section of the Q Rip subwindow, select the third radio button from the top, to enable resizing of the image.
Make sure the checkbox to the left of the padlock icon is checked to lock in the original aspect ratio of the image (preventing distortion of the horizontal & vertical proportions), then resize as desired.
When resizing images, remember that if you upscale the image to print at a size larger than the design then your image quality will be degraded. The larger the percentage of upscaling, the more the quality will be reduced. Creating artwork designs at or larger than the dimensions to be printed is recommended.
Select the desired positioning of your image on the garment. This should be Top Center unless you’re doing something specific which requires some other print positioning.
Note the Mirror and Invert image options, which are typically not used. Mirror Image will print the design backwards, which is useful for Direct-to-Transfer (DTF) printing, or anytime you want to reverse the horizontal axis of your image. Invert Image will print your image’s photonegative — a dramatic effect seldom needed, but available.
Locate the two printer icons on the bottom right corner of the QRip subwindow. The icon on the left is the Print Setup icon. Click it to open the Print Setup window.
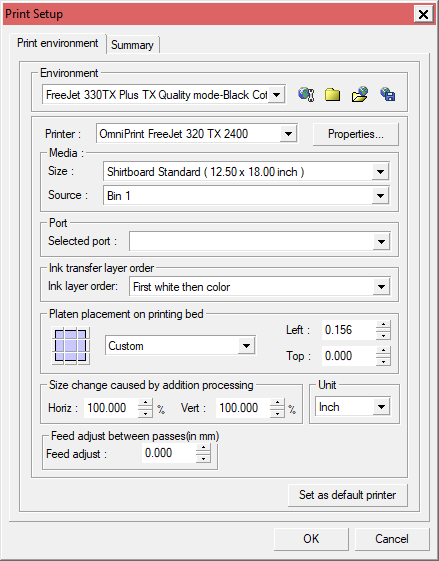
Print Setup
Note that the Platen placement on printing bed setting should never be changed. It has a completely different purpose than the Position setting in the Q Rip window, even though both settings are presented with the same 3×3 grid.
In the Print Setup window, select “Epson Stylus Photo R2400” from the Selected port dropdown box, then click the Properties button to pull up the Properties window.
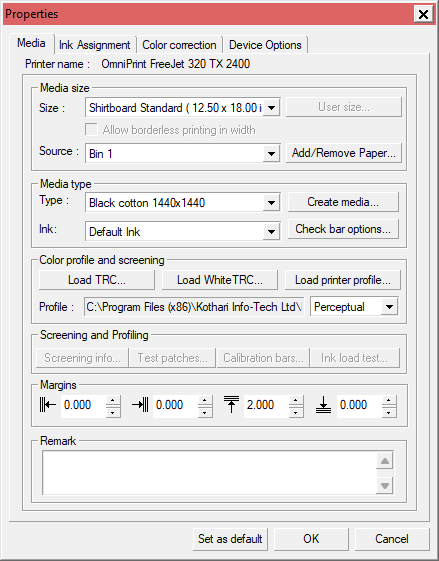
Print Setup — Properties window
In the Properties window’s Margins section, set each desired margin. These margins set print position offsets from the justification setting previously selected in the QRip window. Each of the four arrows point to the side from which the margin can be set. For example, the 3rd box with the upward-pointing arrow indicates setting a margin from the top.
It’s a common practice in DTG printing (and garment printing, in general) to leave a 2″ margin down from the collar before printing the design.
Note that the dimensions of any margins selected are added to the dimensions of the print, as previously configured in the Q Rip windows, and the total must not exceed the dimensions of the print area — 12.5″ x 18″ on the Standard Adult platen. So, if you will be adding a 2″ top margin then the height of your design must be 16″ or less, as configured in the Q Rip window.
Click ‘OK’ to finalize the Properties settings and close that window, then click ‘OK’ again on the Print Setup window to close it and save the settings.
Final Preparations
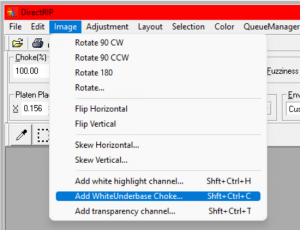
If you’re using the Dark or Black environments on a 330TX Plus, or the Color or Black environments on the 330TX, DirectRIP will generate a White Underbase. Since white ink may slightly expand when it lands on a garment, we will need to slightly restrict the edges of the underbase to compensate and ensure that there won’t be an unintended white “halo” around the edges of the printed design. To do this, select the Image menu near the top left corner of DirectRIP, then select ‘Add WhiteUnderbase Choke’ from the menu — the second-to-last option on the list.
Add white underbase choke
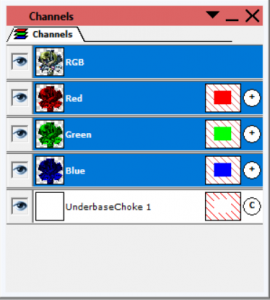
Click ‘OK’ on the dialogue box that appears to accept the default of 2 pixels for the white underbase choke, then confirm that “UnderbaseChoke 1” has appeared in your Channels Palette.
Channels, with white underbase choke
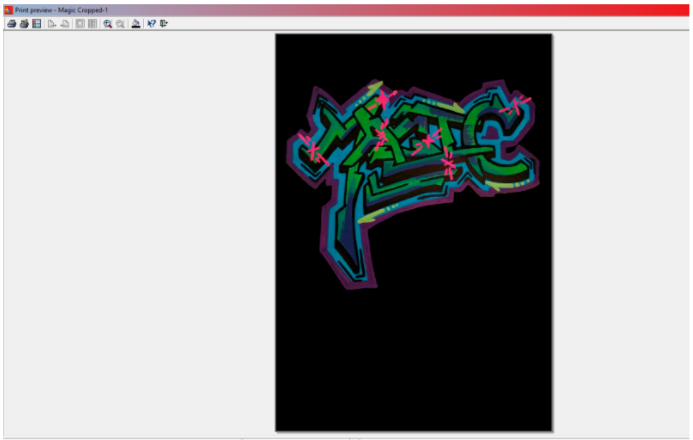
At this point, the design is technically ready to print. But, you always want to be careful and make sure it has been formatted correctly! To check your work, right-click your image and select Print Preview.
Print Preview
The image displayed in Print Preview is proportionally accurate to the way your design will look when printed on the 12.5″ x 18″ Standard Adult Platen. You can reasonably expect the design to appear on the print surface the same as it appears on this screen. To make sure you get the most accurate comparison, select the fill bucket icon (3rd from the right among the icons at the top of the screen) to change the background color to match your garment or print surface.
If everything in the preview looks solid, tap the Esc key on your keyboard to exit Print Preview mode.
DirectRIP print job setup speedrun
Starting the Print
Once your print job is completely configured, you’re ready to print! Run through the following checklist to make sure everything else is properly set up:
Is the platen properly mounted on the printer and flush against the alignment rails?
Is a pretreated garment mounted smoothly and securely on the platen?
Have you properly adjusted the platen height?
Is the gantry in the Print Ready (fore) position?
If you can answer “Yes” to all of these questions, you’re good to go!
As you can see, there are a few steps to configuring prints in DirectRIP, but the process is not complex and can be completed within a minute if your graphic is ready to go. Once you’ve performed a few prints, you’re sure to get it down to muscle memory in no time.
DTF printing comes with its own unique set of advantages so many DTG printer operations are running some of their print jobs using the DTF technique!
Freejet printers are fully capable of printing vibrant, durable, and profitable transfers. Best of all, expanding your Freejet operation to include film transfer printing is easy, requiring just a few modifications to your software and workflow!
This guide will take you through the process of importing the latest DTF Environments for the Freejet 330TX or 330TX Plus into DirectRIP, so you can try out this exciting kind of garment printing yourself!
Loading the DTF environments into DirectRIP
Download links for the Freejet 330TX and 330TX Plus DTF Environments (.kie files) are listed at the bottom of this article.
Make sure that the file that you download matches your printer model as the different inks in the 330TX and the 330TX Plus require different Environments. Using the incorrect environment can result in ink bleeding or poor adhesion.
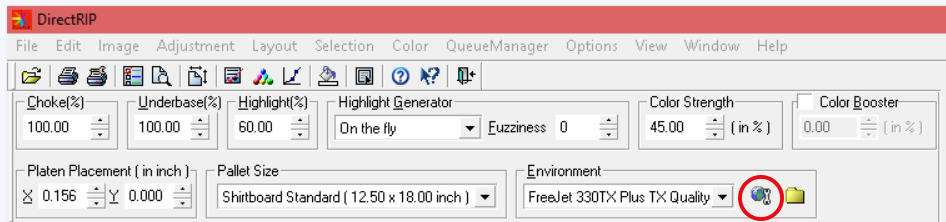
In DirectRIP, next to your “Environment” drop-down box, there is an icon that looks like a globe with a wrench for ‘Manage Environment’.
Click this ‘Manage Environment’ icon.
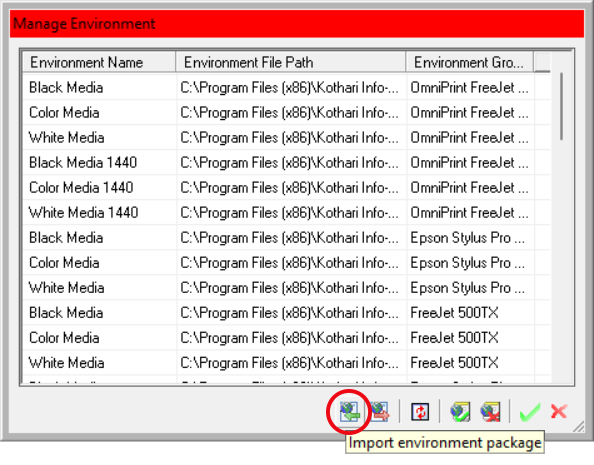
The ‘Manage Environment’ window will open. Click the leftmost icon at the bottom of this window to open the ‘Import Environment Package’ window.
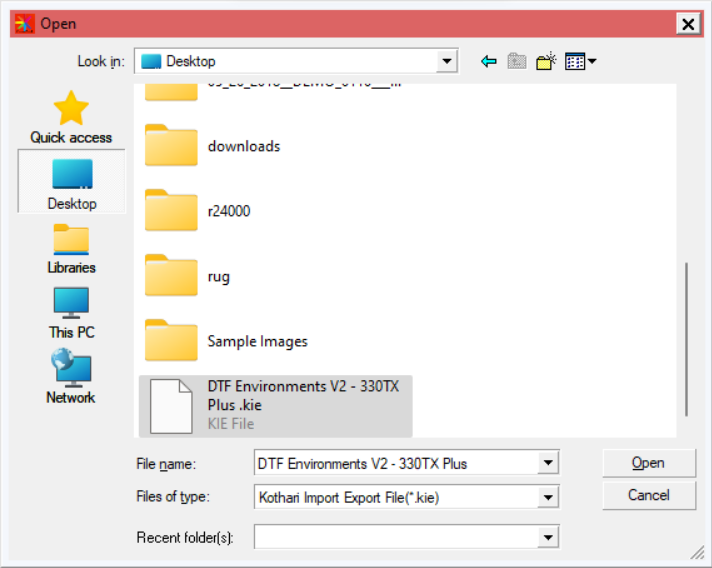
In the window that appears, navigate to where you saved the downloaded .kie file, select it, and click the ‘Open’ button.
The below screenshot examples are for a previous version of Environments for the Freejet 330TX Plus. There will be differences in file & Environment names for later versions, but the process is the same.
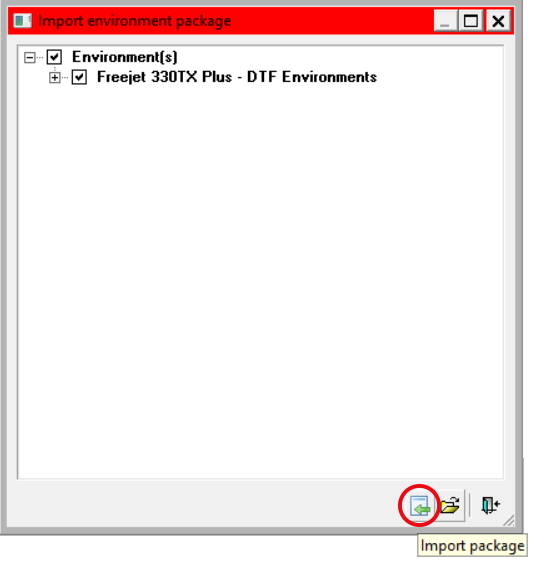
You should arrive at this window:
Click the ‘Import Package’ icon. This will import the new environments and the ‘Import environment package’ window will automatically close.
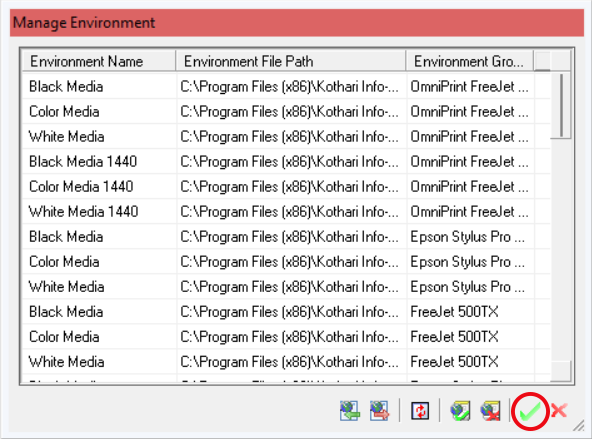
Next, click the green checkmark on the ‘Manage Environment’ window to save the update and close the menu.
That’s it! The environments are now fully installed! You can now use them to print transfers!
It’s important to have a basic understanding of how the ink delivery system works and the parts that are involved. Knowledge is power, and understanding the basics of how ink gets from the bottles to the print head empowers us to use deductive reasoning to quickly troubleshoot and resolve most ink flow issues.
Here’s a full list of the components of the ink delivery system:
Ink bottles (8)
Ink lines (8)
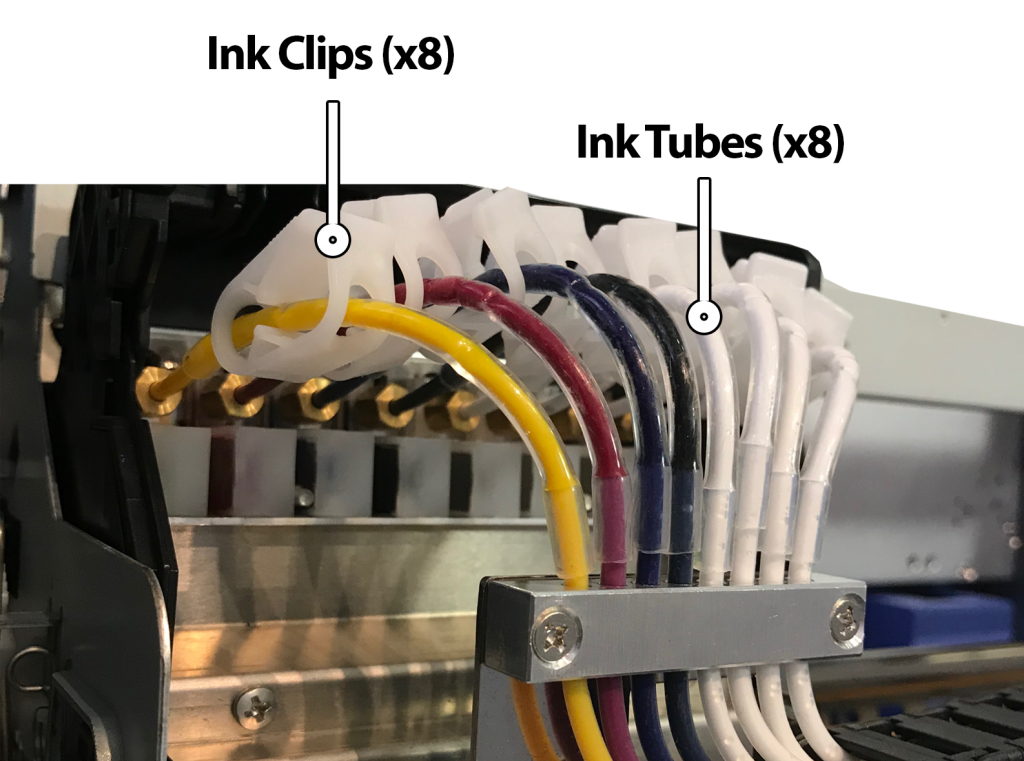
Ink tubes (8)
Ink clips (8)
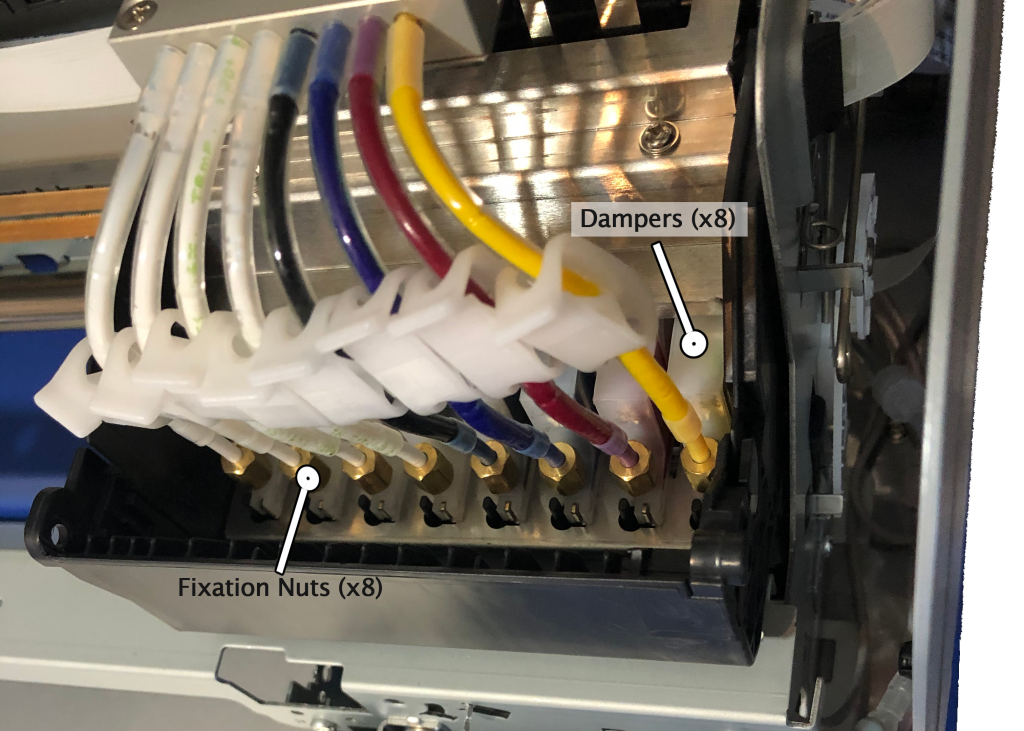
Dampers (8)
Damper fixation nut (8)
O-rings (8)
Print head
Pump with capping station
Since we have eight ink channels (cyan, magenta, yellow, black, and four whites), there are eight of each part in the ink path until we get to the print head.
Let’s first define the purpose of each component, and then we’ll briefly go over how they all work together to get ink from the bottles and onto the garments when we print.
Component Functions
Ink bottles: The ink bottles provide a reservoir of ink for each channel. These are the beginning of the ink path for each of the eight ink channels. Each bottle has a metal fitting, through which an ink line will pass as it moves out of the bottle.
On the Freejet 330TX Plus model, there will be a second fitting on each white ink bottle. This is where white ink returns to the bottle when the circulation pumps are running. However, this white ink circulation circuit isn’t functionally part of the ink delivery system so won’t be detailed further here.
Ink lines: The translucent, plastic ink lines provide the majority (roughly 90%) of the path between the ink bottles and the print head. In combination, they’re an 8-lane ink expressway with no stops and no lane changes allowed.
One end of each ink line passes through a fitting on its ink bottle and extends down to about 1/4″ to 1/2″ from the bottom of the bottle. The other end of each ink line terminates inside the gantry, where it connects to an ink tube.
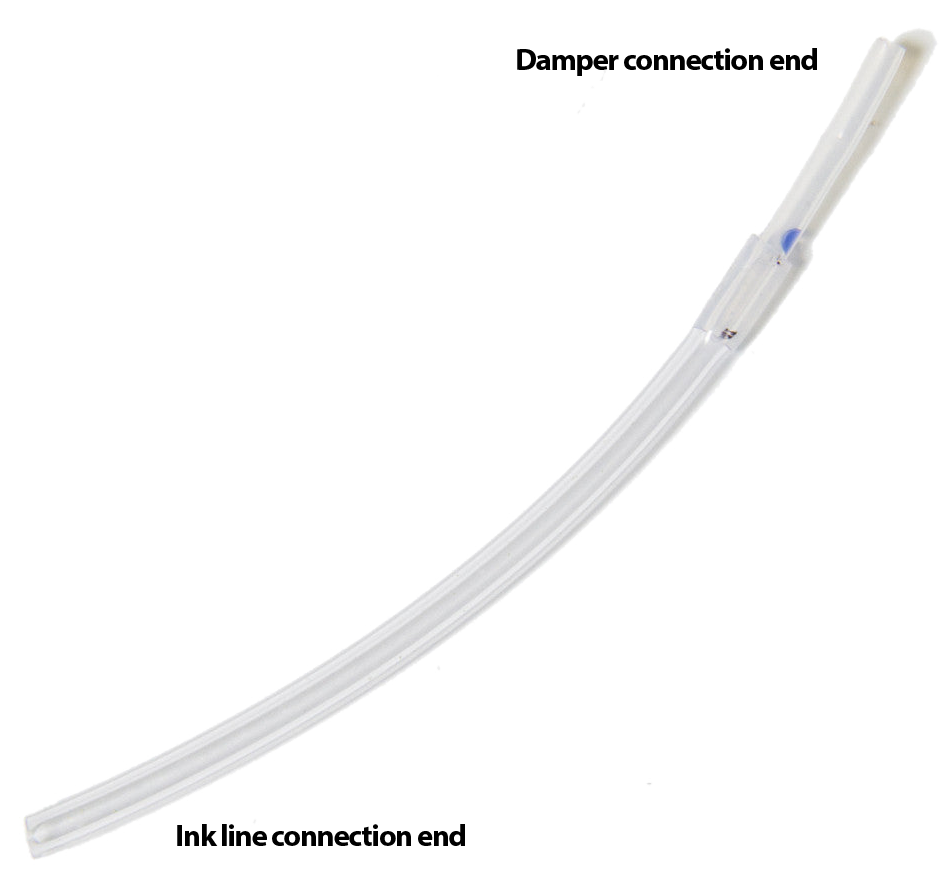
Ink tubes: The short (about 3″), softer plastic ink tubes are the “last mile” of the ink path, providing a flexible interconnection between the ink bottles and the dampers. If the ink lines are an ink expressway then the ink tubes are the off-ramp where the ink has almost reached its destination.
The Ink Tube connects the ink line to the damper.
The larger end of the ink tube tightly slips around the ink line, while the small end is attached to the damper with an o-ring and copper-colored nut.
Ink clips: The purpose of the ink clips is to crimp the ink tubes and shut off ink flow when desired (such as when the printer is idle.)
Dampers: Dampers provide the final “Quality Assurance” for ink with their mesh filter, which serves to trap bubbles and any dried ink or foreign material that doesn’t belong in the ink supply. (Better to replace a clogged damper than to have to replace a clogged print head.)
Damper fixation nuts & O-rings: These two parts complete the air-tight, mechanical connection between the ink tube and the damper. The o-ring goes around the smaller end of the ink tube and presses against the inside of the fixation nut to ensure an air-tight connection when the nut is attached to the damper.
The dampers and their associated o-rings and fixation nuts are the last components in the printing ink path before the print head.
Print head: The print head is where it all comes together — literally. All eight of the ink channels feed into the eight posts on top of the print head, to which the dampers directly connect.
Print head top, with damper posts.
The purpose of the print head is, of course, to deliver the ink to the garment that we’re printing onto through the over 1,400 tiny nozzles of the print head plate, on the bottom of the print head.
All of the components listed above except the print head itself are completely passive while the printing. That is, they are simply a conduit for the ink to travel through.
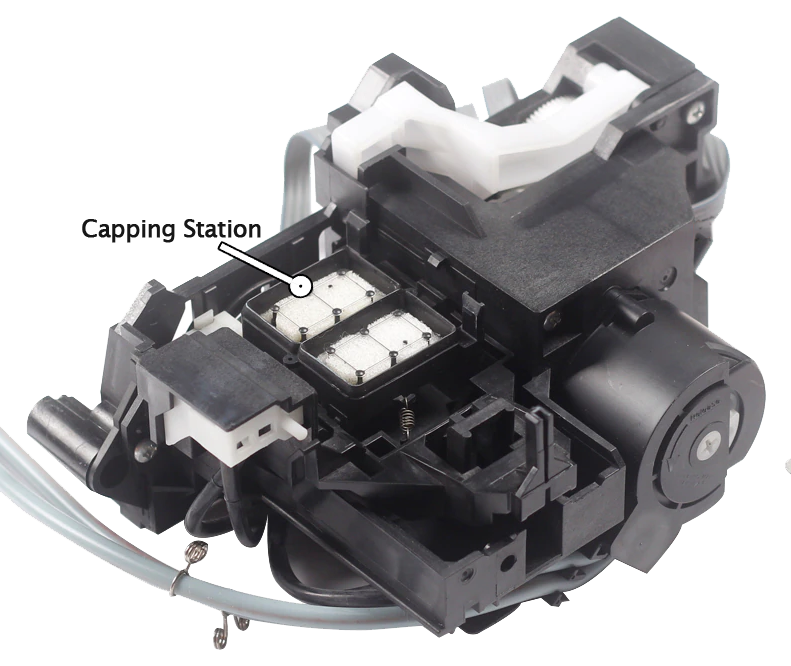
Pump with capping station: Ink doesn’t actually flow through the pump when we’re printing, but it’s included here because it is instrumental for priming and for running head cleans before or between print jobs.
The purpose of the pump, with regards to ink delivery, is to pull ink through the print head nozzles when priming and running head cleans, but not when printing.
Ink Flow Dynamics
When printing, ink is jetted out of the print head nozzles by micro-piezo electronics within the print head. This creates pulses that push drops of ink out of nozzles as the carriage moves back & forth. This happens very quickly and very precisely in order to produce high-quality prints at high resolution.
You may wonder, if it’s only the print head that actively does anything to make ink flow while printing, what causes the ink to flow into the print head while printing? Essentially, it is gravity — but more specifically, the ink delivery system is a type of siphon. As the print head expels drops of ink, the siphon effect causes more ink to be drawn into the print head from the bottles, through the ink lines, tubes, and dampers.
In order for ink to flow properly through a siphon system, every component and connection in the system must be air-tight. So while this isn’t a troubleshooting guide, if one of your ink channels starts dropping out while printing after getting a perfect nozzle check, you may want to verify the following:
Your FreeJet printer package includes one Standard Adult platen, providing printing surface dimensions of 12.5” x 18”. The Standard Adult platen meets the needs of the vast majority of t-shirt print jobs. However, as your clientele and business expand, you may want to extend your offerings for different sizes and types of garments.
Let’s take a look at the types of platens available from OmniPrint to help you address other types of printing.
NOTE: All of OmniPrint’s platens are available for purchase through your OmniPrint sales rep and directly from our online store.
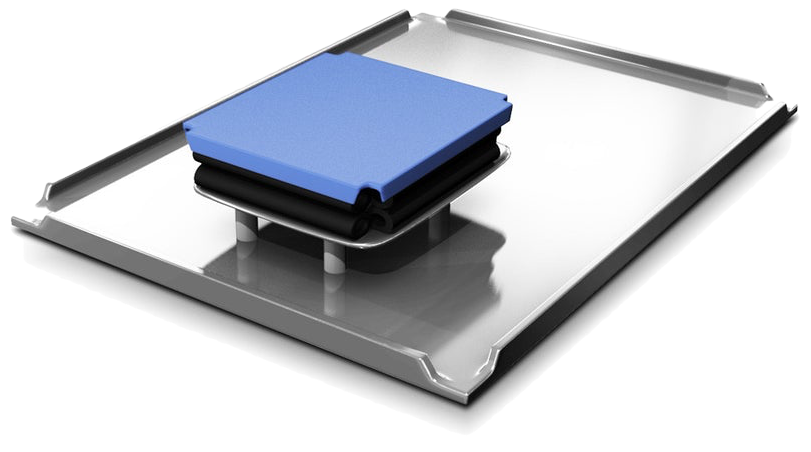
Threadable Adult & Youth Platens
The Threadable Adult platen is the same size as the Standard Adult platen and is very helpful when printing on both sides of a garment, by isolating the front of a garment from the back – for example, to create a full back print on a t-shirt with a pocket on the front, or on a polo shirt with buttons on the front.
OmniPrint Threadable Adult Platen
If a threadable platen is not used in such cases, we’re creating the risk of getting a head strike due to the raised areas. Even if we do set the height appropriately for the highest spot on the garment (where it is lifted a bit by the pocket, seams, or buttons on the front), then our print will not be quite as sharp as it could be, due to the print head being a bit further away from the main body of the garment.
Threadable platens are the solution to this type of otherwise risky situation. OmniPrint offers threadable platens in both the Adult and Youth sizes.
Alternative Sizes and Shapes
When expanding product offerings to include options for much smaller and larger sizes, or to create custom prints on select areas, we want to take advantage of some other types of platens. Using the proper platen size helps greatly to ensure that we’re always creating a perfectly flat print surface by avoiding the presence of seams, stitching, etc., which creates the risk of head strikes or head rubs if printing smaller garments on a platen designed for adult shirts.
It is important to manually set the height of your platen when setting up a print using any platen smaller than the Adult platen. This includes all platens listed below except for the XL Adult platen, along with all of the dual platens. Do not use the automatic height setting feature (‘Function’ + ‘Rear’) when using these smaller platens.
Here’s a brief summary of these alternative platens and their dimensions.
Platen
Dimensions
Image
Chest
6″ x 6.5″
Toddler
7.5″ x 10″
Youth
10.5″ x 13″
XL Adult
12.625″ x 22.6″
Sleeve
4.25″ x 16.5″
Note: All platens have a 13.25″ x 17.312″ base for a perfect fit and alignment on your FreeJet’s platen table
Positioning the Platen
All platens are always positioned with the end of the platen where the top is flush with the base towards the front of the printer, or to the left when facing the FreeJet control pad. As always, make sure the platen’s base is pressed against the two alignment rails.
Setting Up a Print with Single Platens
The process for setting up a print in DirectRip using one of the above-listed platens is the same as for a Standard Adult platen with one caveat — the print alignment must always be set to Top Center in the Q-Rip window.
Remember that the dimensions of your graphic plus any top margin you may add must fit within the dimensions of the platen. For example, when using the Chest platen the maximum size of the image (after sizing in DirectRip’s Q-Rip window) must be no larger than 6″ wide and 6-1/2″ high.
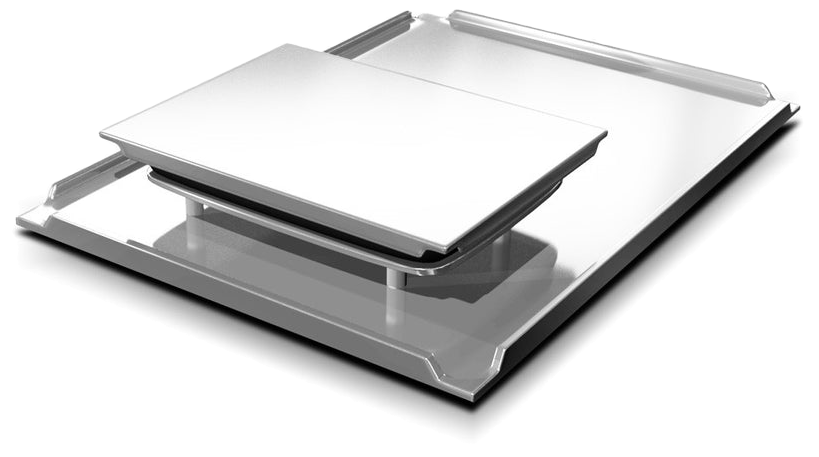
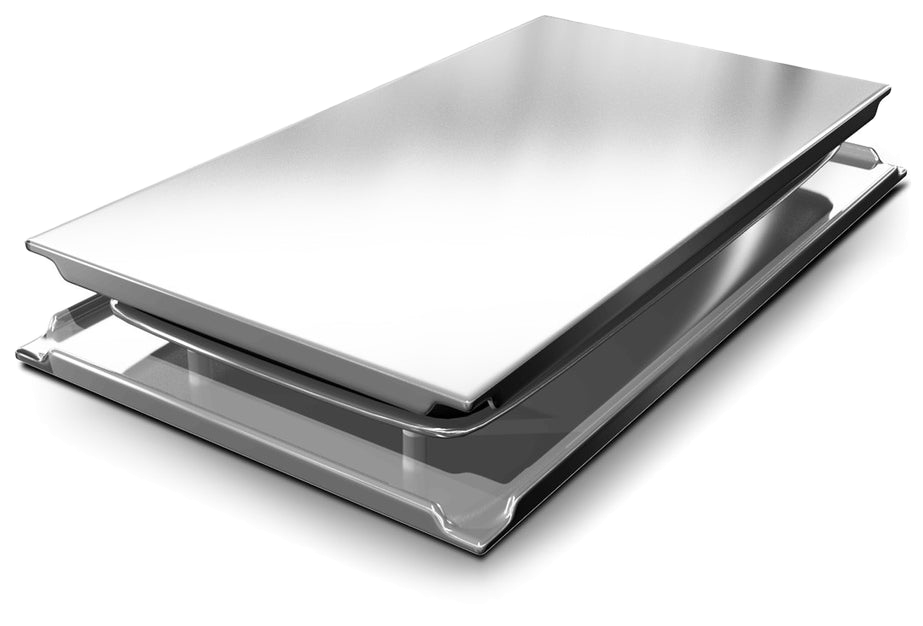
Dual Platens
When doing a significant volume of smaller garment printing, we want to consider using a Dual Platen, so that we can print two items at the same time. As the name suggests, Dual Platens have two top pieces mounted onto a single base. Of course, this means there can be dual platens only for the sizes of platen tops which are no larger than half the size of the base.
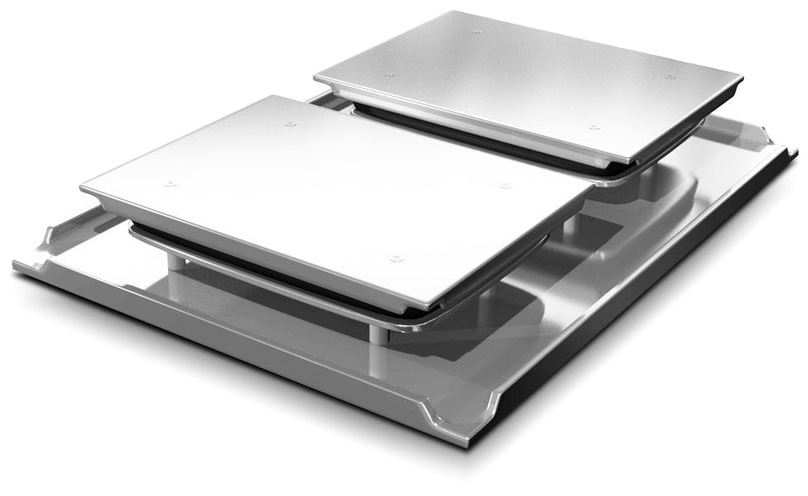
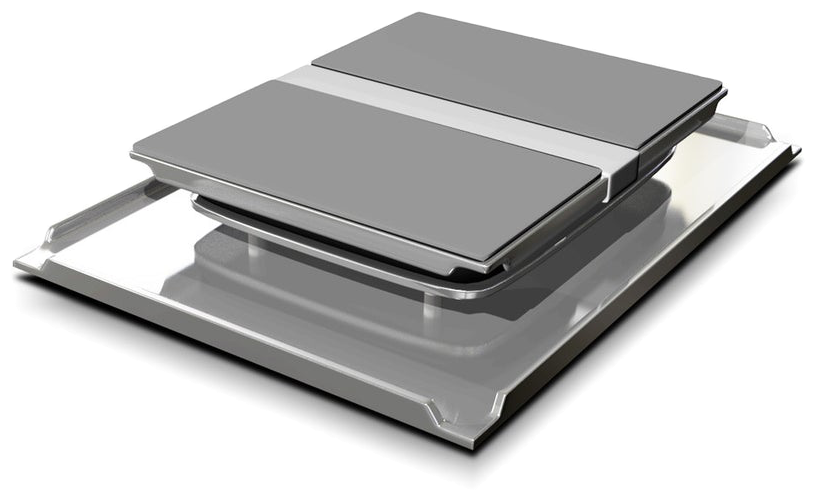
OmniPrint offers dual platens in the Sleeve, Toddler, Youth, and Chest sizes.
OmniPrint Dual Toddler Platen
Setting Up a Print with Dual Platens
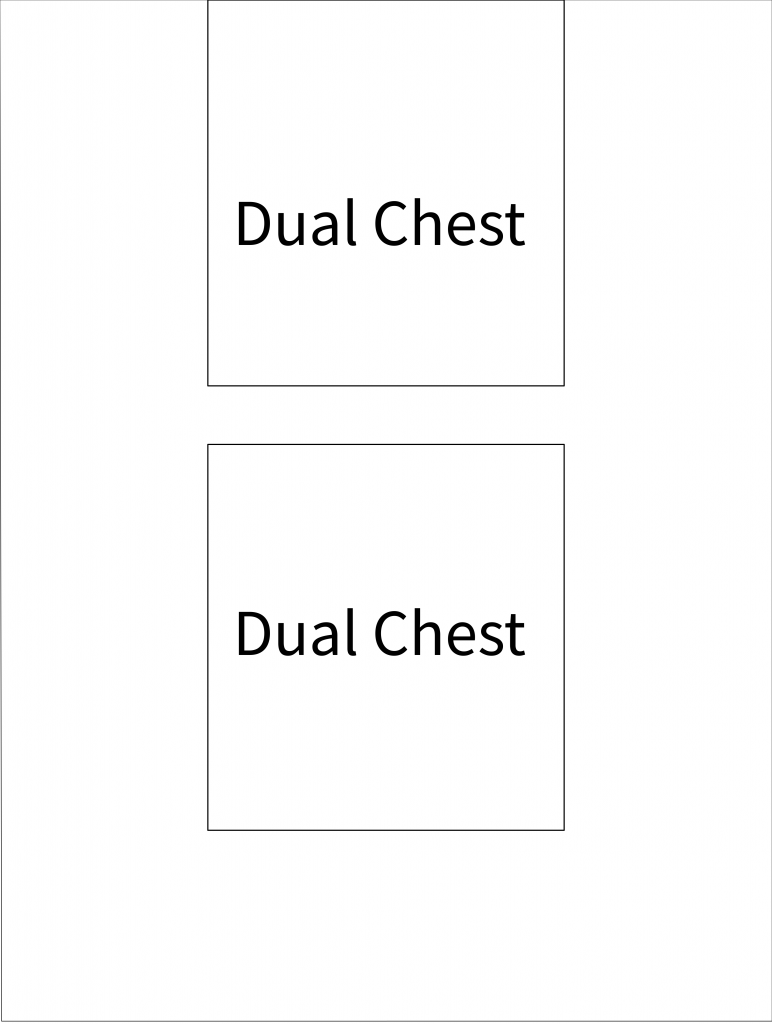
We need to use OmniPrint-provided .psd templates (Photoshop files) to duplicate and position (using guide layers) our existing artwork so the images will be perfectly aligned to print in the exact positions of the dual platen tops.
Example of a dual platen template.
In an actual Photoshop template, the above example is a layer that is turned off (so it won’t be printed) after the design images are positioned and before the file is exported for loading into the RIP software.
The Dual Platen template files, in Photoshop format, are available for download at the bottom of this article. The zip file contains templates for the dual sleeve, toddler, youth, and chest platens.
Zipper Hoodie Platen
Printing on zip-up hoodies presents a challenge due to the full-length front zipper and associated seams. The Zipper Hoodie platen takes a unique approach by providing a lowered channel in the center where the zipper of a hoodie can be positioned. This allows us to get a better quality print while reducing the risk of having a head strike on the zipper. It’s still very important to manually set the height very diligently to avoid head strikes and head rubs.
The Zipper Hoodie platen is oriented at a 90-degree angle compared to our other platens, so the hoodie is positioned as what we might consider sideways on the printer. To work with this arrangement, we need to make sure our artwork is also rotated 90-degrees.
OmniPrint’s Hoodie platen
Alternative Platens Summary
We offer a variety of platens to make sure you have the right tools available to print on a wide variety of garments. You can save yourself a lot of time and trouble by making sure you’re using the right tool for the job.
Beyond this support for various garment sizes, OmniPrint also offers platens for printing on hats, shoes, and facemasks.
It is important to maintain a temperature range of 60° to 80° Fahrenheit and a Relative Humidity range of 45% to 65% to avoid negatively impacting:
Print quality
Proper consistency of ink and pretreatment
Shelf life of ink, adhesive powder, and pretreatment
Service life of print head
How does the environment impact print quality?
If the humidity is too high, fabrics can absorb and retain moisture, causing ink to bleed. We recommend doing a final heat press on any garment that was previously pretreated to steam out any moisture and remove any wrinkles.
How does the environment impact ink and pretreatment?
The shelf life of our inks and pretreat material is normally one year, but temperatures exceeding 80° Fahrenheit can cause the consistency of inks and pretreatment to permanently change, whether in the equipment or still in their original containers. If this happens the nozzles of the print head or pretreat device may clog, so the material should be replaced to avoid damaging your equipment.
How does the environment impact the service life of the print head?
If the humidity is too low atomized ink can dry on the print head plate and cause clogging. Also, if temperatures exceed 80° Fahrenheit the consistency of the ink can permanently change and result in clogging print head nozzles, potentially requiring that the print head be replaced.
Clogging of the print head due to temperatures or relative humidity outside of the recommended ranges is not covered by your printer’s warranty.
One of the most potentially damaging problems that can occur with your printer is a head strike or head rub. Avoiding this will extend your printhead’s life and save you the expensive of lost time & materials, and possibly expensive repairs.
What is a head strike?
A head strike is when a printhead contacts a garment, film, or platen.
Results of a head strike
If a head strike occurs, the printhead may be damaged. If the head strike is on a pretreated garment it will likely clog nozzles and may permanently damage the printhead. At the very least, a head strike will smear ink on your print so result in scrapped materials.
How to avoid head strikes
Properly positioning the platen, mounting the garment, setting the platen height appropriately (so that the print head has sufficient clearance), and keep the film properly aligned (in DTF printing) will ensure that you avoid experiencing a head strike.
What to do if you get a head strike
Immediately lower the platen (on DTG printers).
Abort the print job.
Prime all ink lines for a full pump cycle (on Freejets) or Load Ink for 15 seconds.
Monitor the waste ink bottle and interrupt priming to empty it, as needed.
Run two head cleans
Print a nozzle check
If the nozzle check is good, continue printing to keep ink flowing through the nozzles, then wet cap in Super Nozzle Cleaner overnight when finished printing.
If a good nozzle check cannot be achieved by following the above steps, contact tech support to see if permanent damage can be avoided.